
External Files Databases
Introduction
HR Manage stores all documents, attachments and employee photos in one or more external SQL Server databases. This ensures that the main database only contains core data without growing to rapidly and prevents databases from becoming too large to manage. Once a files database becomes too large, simply create a new one and set it as the active database.
Note that this functionality can only be managed by someone from People Resolutions or someone in the IT department as it requires a SQL database to be created. Access to the database can be local for the HR Manage Server (meaning that it doesn’t need to be accessible from other computers like the clients).
Configuring a Files Database in HR Manage
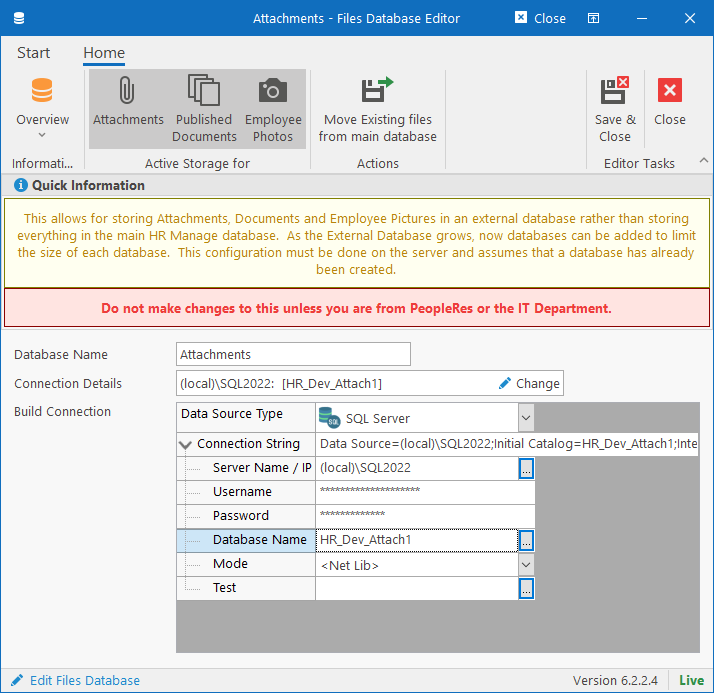
To configure a new files database in HR Manage, go to the HR Manage System Configuration and click on External Databases in the left menu. Then click on the Create New button in the ribbon bar to get to the screen above.
Now simply specify a friendly name for the entry (for identification purposes within HR Manage) and build the connection to the SQL database. The database only need to be accessible from the server on which HR Manage is installed. If the database isn’t accessible from the computer you’re using, maybe do this configuration by running the HR Manage client application on the server instead so that the connection can be tested.
Finally, in the ribbon bar, you can specify what must be stored in this files database. You can select / deselect “Attachments”, “Published Documents” and “Employee Photos”. Any new files that are saved (depending on the selection here), will be saved in this database going forward.
Move Existing files from main database
If until now, the attachments, documents and employee photos were stored in the main HR Manage database, you can move all those files out to the newly created files database. Note that to do this, you must be running the HR Manage client application on the server itself or the option won’t even be available.
If the button is available (in the Actions ribbon bar), simply click it and follow the instructions. You should perform this after hours and stop the “HR Manage Server Components” before proceeding to prevent other users from making changes to the files while the operation is in progress. Once the operation has completed, you can start the service again.
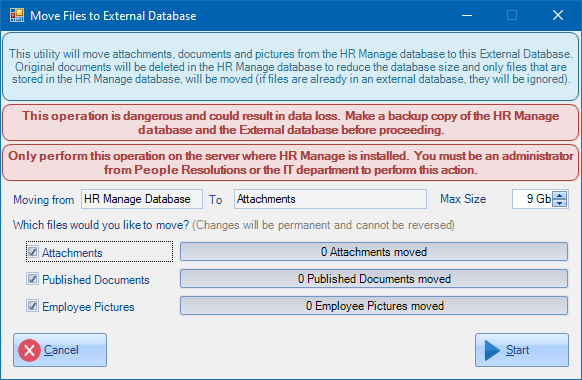
In the window above, simply select which types of files should be transferred and specify the maximum size of the total transfer. SQL Server Express edition has a limit of 10Gb per database, so if you’re moving transferring files from a bigger database to databases hosted on SQL Express, you can specify a smaller size here. In effect, if your main database is larger than 10Gb, you’ll probably have to run this process more than once (for each external database), until all files have been transferred.
Configuration in SQL Server
Create the database
In Microsoft SQL Server, simply create a new database and call it something like “HR_CompanyName_Attach?“. Replace CompanyName with your company’s short name or whatever your HR Manage database is called and replace the ? with the files database number, starting with 1.
Download the following script and open it in a new Query window in SQL Server Management Studio. Make sure the newly created database is the active database for the query window. Then simply press F5 once to execute.
Script: BlankFilesDatabase.txt
Create the SQL Login
Now create a new SQL Login with the following settings:
- Login name: You can use any name you wish, but something like “HRManageFiles” will do.
- SQL Server authentication: Select
- Password: Specify any secure password consisting of numbers, letters and special characters. You can make it a very long password of random characters because you’re only going to use it once.
- Enforce password policy: Off
- User Mapping (page on left)
- Select the newly created database and mark the checkbox
- In the Database role membership list at the bottom, mark the checkbox for “db_owner”.
- Save the Login by pressing Ok.
Now simply use these login credentials and database name when creating a new External Database entry in HR Manage.