
Creating / Editing Assets
Introduction
The Asset Editor allows the capturing of all information related to the asset and its owner. The Assignments are also managed from here.
To open the Asset Editor, simply create a new or open an existing asset from the Asset Register.
Asset Details tab
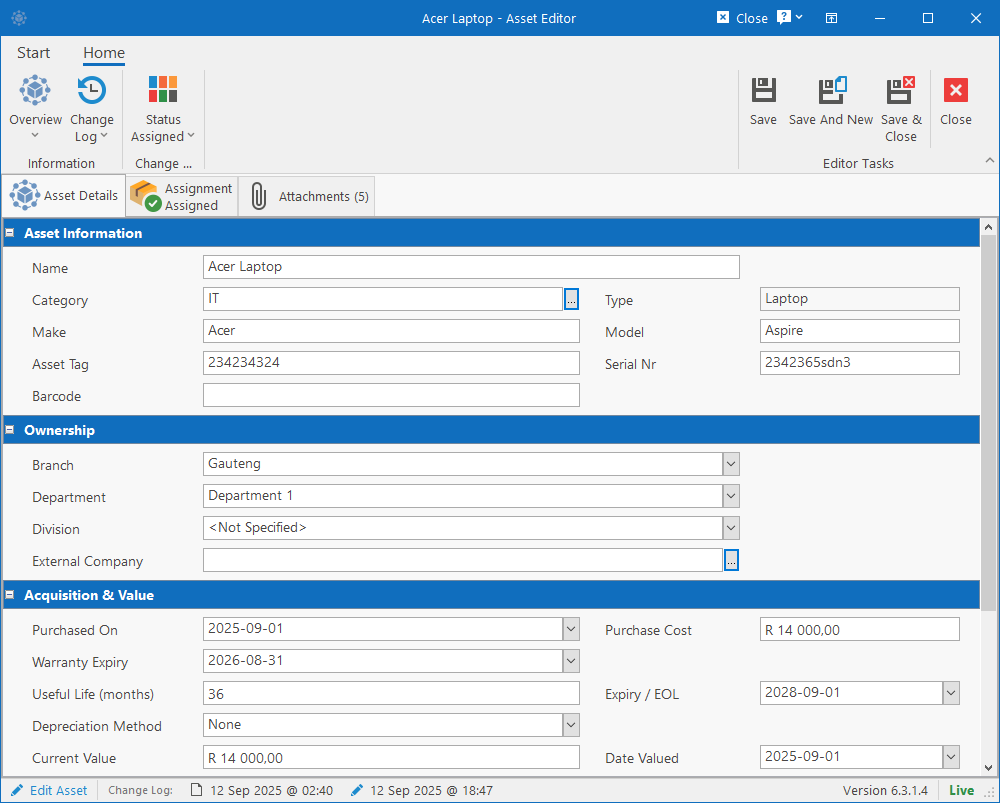
Asset Information
This section details the main information about the asset that is used to identify and classify the asset.
- Name: Friendly name that can be used to identify the asset in the library.
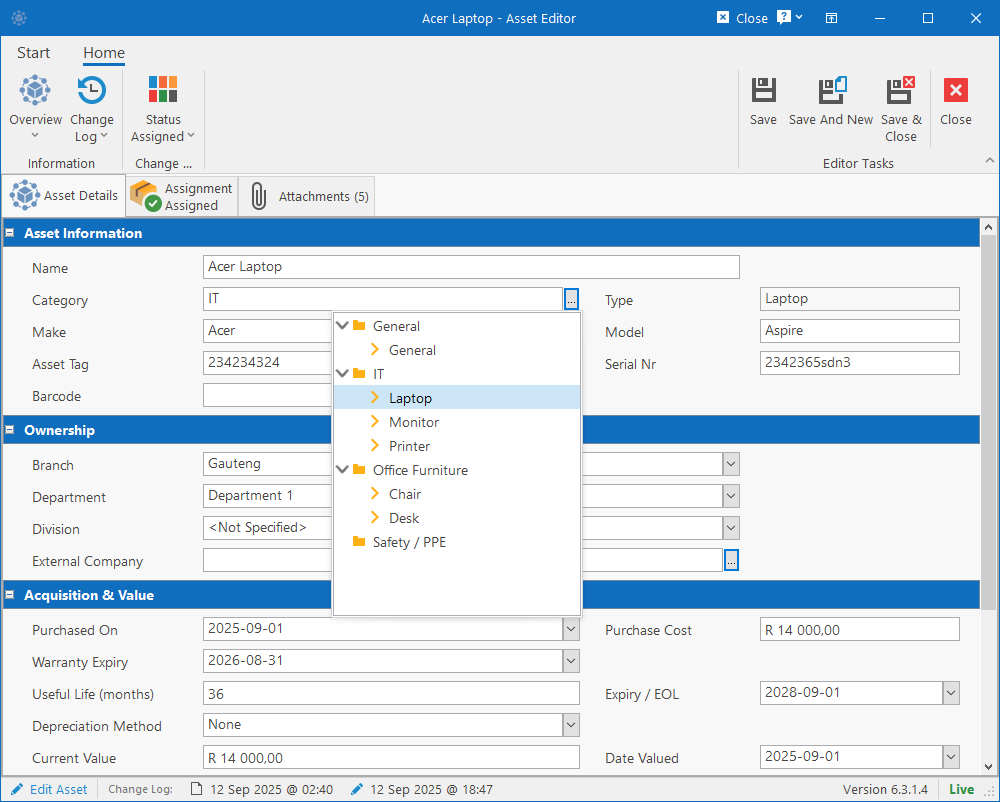
- Category / Type: Clicking on this field will display a dropdown tree where you can select both the Category and the Type of asset. This is configured in the Employee Module Configuration.
- Make / Model: The make (brand) and model of the asset if applicable.
- Asset Tag / Serial Nr / Barcode: Unique identifiers used for the asset. You can complete the fields that apply to the asset.
Ownership
This section details on the site that “owns” the asset.
- Location 1: Either the Company or Location 1 (i.e. Branch) can be selected.
- Location 2: Optional. Specify the location 2 / department that owns the asset.
- Location 3: Optional. Specify the location 3 / division that owns the asset.
- External Contractor: Optional. Specify the external company / contractor that owns the asset.
Acquisition & Value
This section details when the asset was bought, for how much and the rest of the life cycle.
- Purchased On: Date when asset was acquired.
- Purchase Cost: Original cost of the asset.
- Warranty Expiry: When does the manufacturer’s warranty expire.
- Useful Life (months): What is the expected life for the asset. 0 = Ignore. If capturing a new asset, when specifying this value, the Expiry Date will be calculated automatically.
- Expiry / EOL: Date when the asset is expected to reach End-Of-Life.
- Depreciation Method: Method used for calculating depreciation. This is a lookup table in the Employee Module Configuration.
- Current Value: Specify the current value of the asset. When updating this field, the Date Valued field should be updated accordingly.
- Date Valued: Date on which the Current Value field was last updated.
Status & Notes
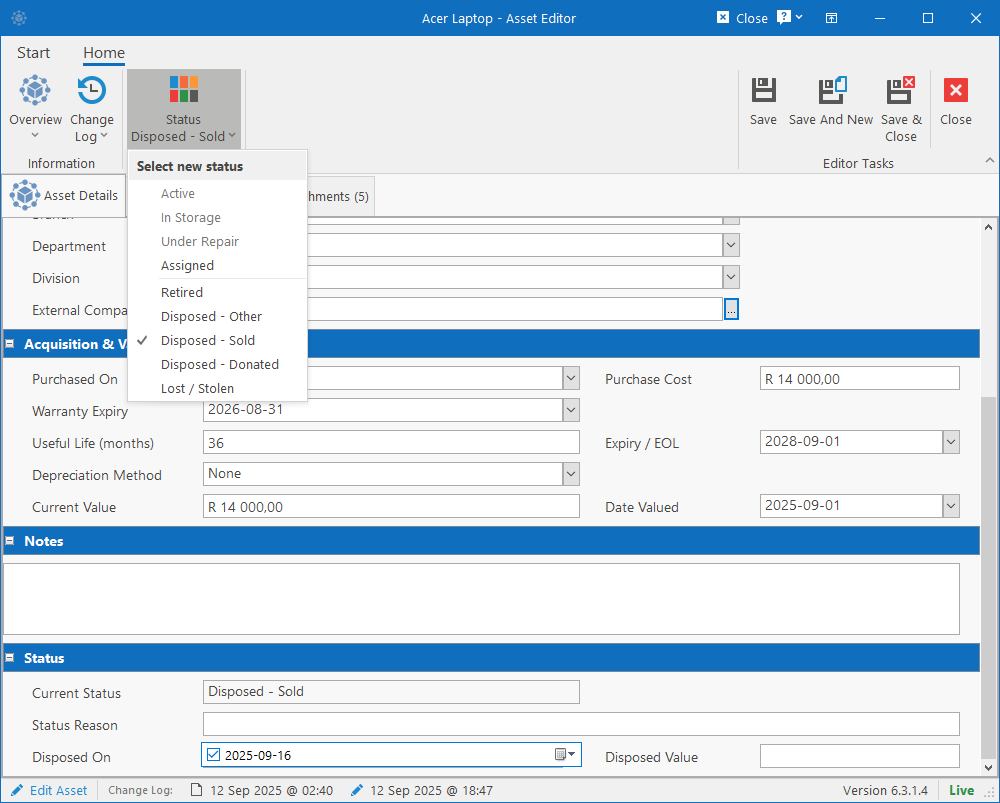
The Status can be changed by clicking the Status dropdown button on the ribbon bar. Certain statuses will be disabled based on whether the asset is currently assigned or not.
If the asset is unassigned, the status can be changed to “Active / Available”, “In Storage”, “Under Repair” or to one of the “Deleted” statuses.
If the asset is already assigned, the status can only be changed to one of the “Deleted” statuses or back to “Assigned”.
If one of the “Deleted” statuses are selected, then the following fields can be completed in the Asset Details tab under the Status section:
- Status Reason: Reason why asset was retired or disposed of. If asset was donated, you can specify who it was donated to.
- Disposed On: Date when asset was disposed.
- Disposal Value: If sold, specify how much it was sold for or specify what the asset was valued for at the time of disposal.
Assigning Assets
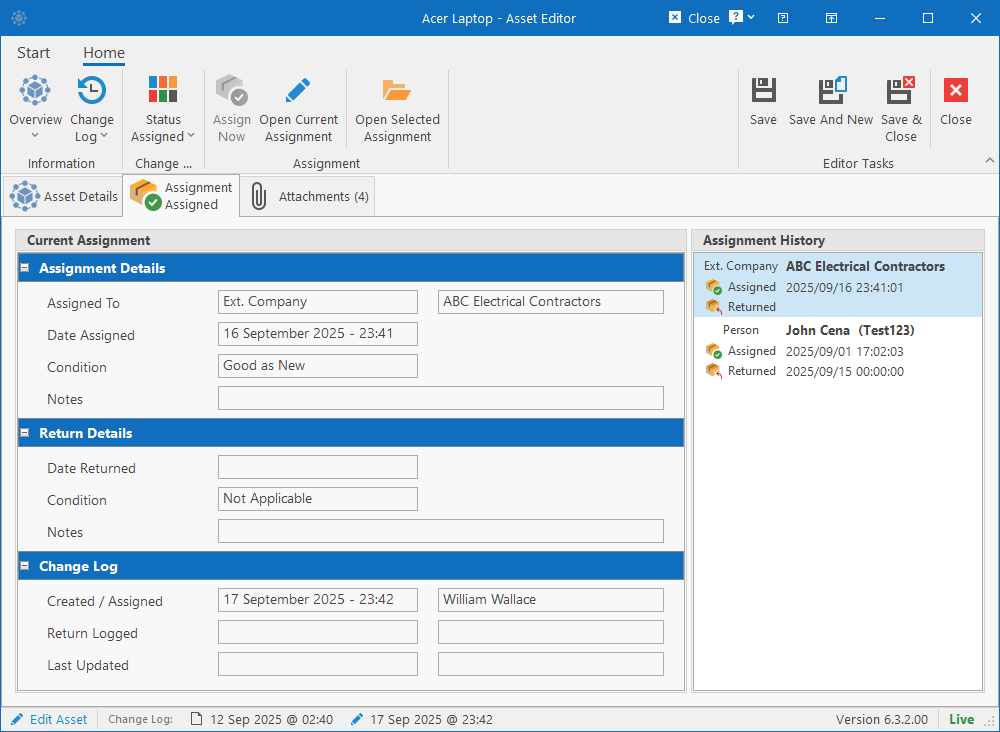
On the Assignment tab, you can see who the asset is currently assigned to. The contents of the tab will look different depending on whether the asset has been assigned or not and whether it has previously been assigned. If the asset has a history of assignment, an additional list with the assignment history will display on the right.
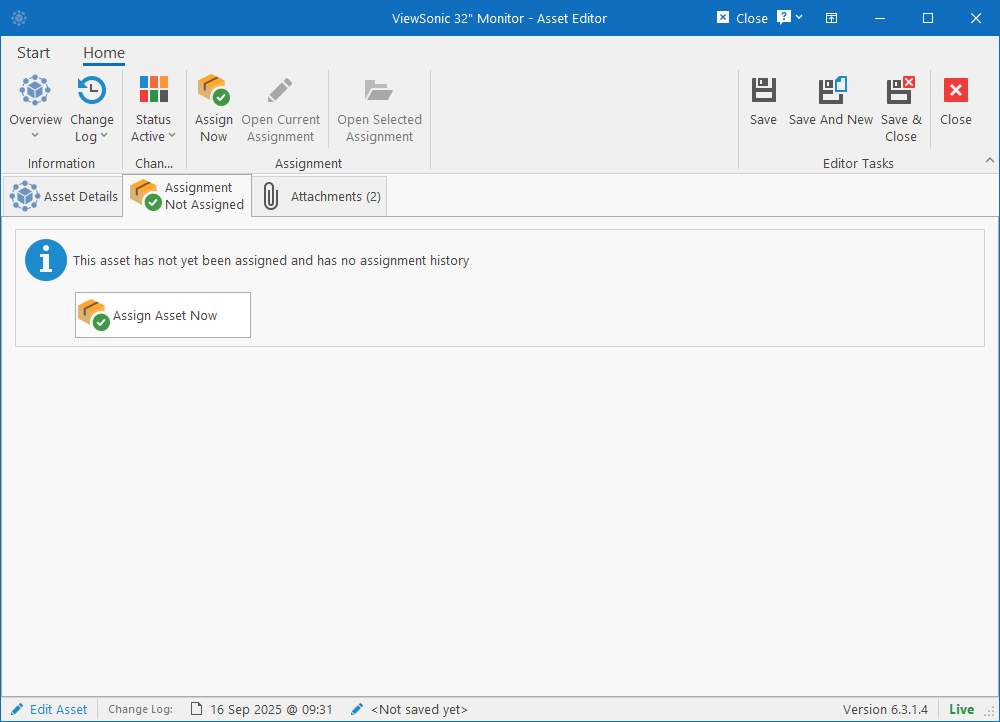
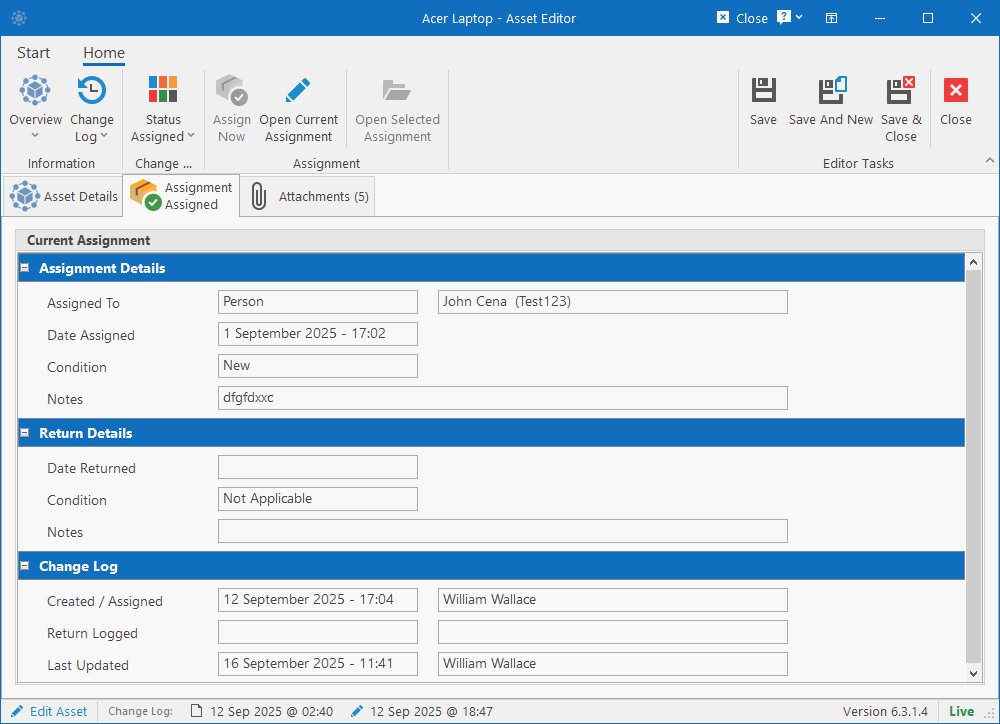
If the asset is currently unassigned, you can click the Assign Now button in the ribbon bar or the Assign Asset Now button on the tab self to create a new assignment.
If the asset is already assigned, the preview of the assignment will be displayed on this tab. To edit the assignment (i.e. log return information, attach files, etc.), click on the Open Current Assignment button on the ribbon bar.
If the asset has been assigned and returned before, the history list will display in a list on the right. To open a history item, simply click on the item in the list and then click on the Open Selected Assignment button on the ribbon bar.
All these actions will open the Assignment Editor where the assignment can be updated.
Attachments
The Attachments tab allows you to upload documents and photos related to the asset.
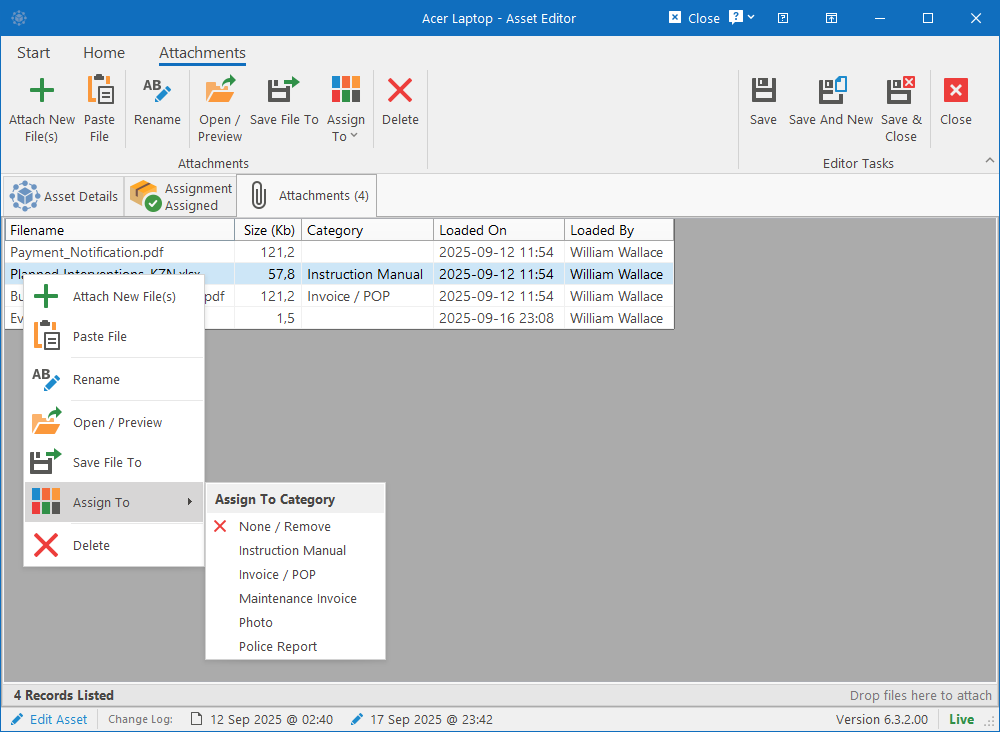
New attachments can be added by:
- Clicking the Attach New File(s) button on the ribbon bar, browsing for the files and clicking Ok.
- Right-clicking on a file in Windows Explorer and then clicking the Paste File button on the ribbon bar. If the clipboard contains a picture, the picture will be converted to a file and saved to the asset.
- Dragging files from Outlook / Windows Explorer / etc and dropping them in the Attachments tab.
Note that when exactly the attachments are saved depends on whether a new asset is being created or an existing one being edited.
- When creating a new asset, files will be stored in the list until one of the Save buttons have been clicked and then the whole asset will be created with the files attached.
- When editing an existing asset, any files added will be saved to the asset immediately regardless of whether the save button is clicked.
The following actions are also available and performing any of these actions will be effected immediately:
- Rename: The system will prompt you for a new filename and will rename the filename in the system.
- Open / Preview: HR Manage will attempt to preview the file internally with one of its built-in viewers (works with Pdf, Word, Excel and Images). If no suitable built-in viewer can be found, the file will be saved to a temporary file and opened using the system’s default associated application for the file type.
- Save File To: Will save the file to a location on your computer.
- Assign To: Will assign the selected file to a file category. File categories can be configured in the Employee Module Configuration and each category can be configured for a “maximum number of attachments”. The system will then ensure you don’t assign more the maximum allowed files per category.
- Delete: This will delete the attachment from the system.