
Custom Tasks
Introduction
Custom tasks that needs to be executed during the import process can be inserted at various points in the process. The following list shows the import process and highlights at which points tasks can be inserted.
Due to the nature, risks and complexity of these tasks, it can only be managed by users that has access to the “IT Administrators” security role. Even HR Manage Administrators don’t have access to this feature by default.
Below this process are two screen prints showing where the tasks can be created.
The Import Process
- Start Import Process
- Process the Import Source or Sources (the following repeats for each import source)
- * Run the Import Source’s Fetching Tasks
- Retrieve the data from the Data Source
- * Run the Import Source’s Post Retrieval Tasks
- Upload the retrieved data to the staging table
- Repeat the previous for every import source
- Perform matching on the staging data
- * Run the Template’s “Before Import” Tasks
- Process the staging table and import the records into HR Manage
- * Run the Template’s “After Import” Tasks
- Complete the import
Managing Import Tasks
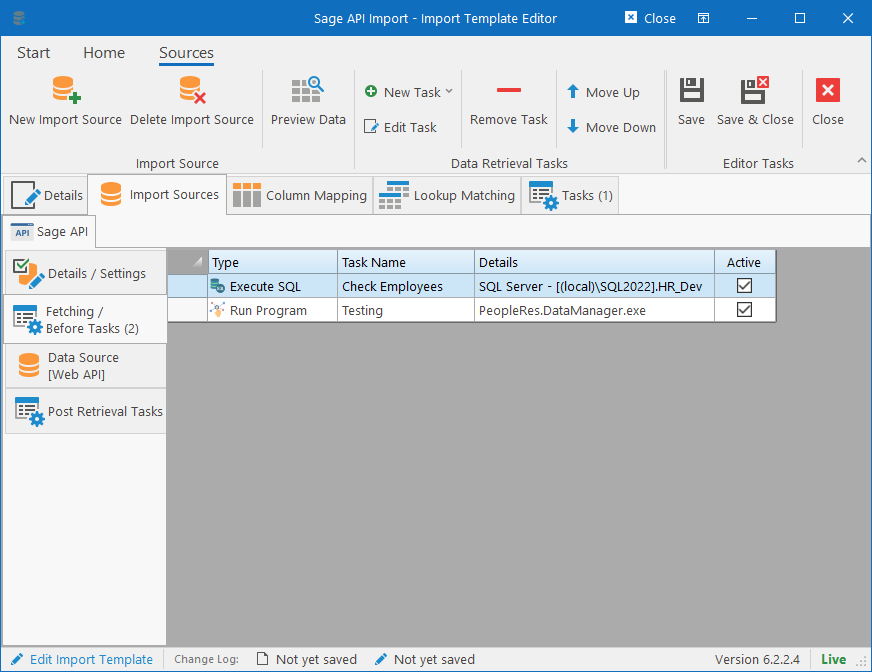
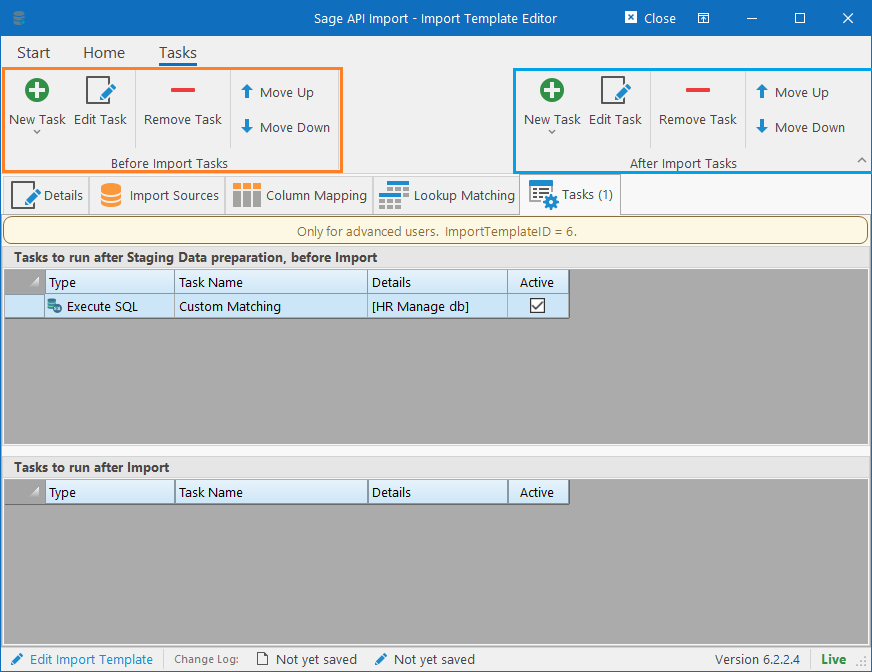
Tasks can be managed from the Ribbon bar. For tasks on the Import Source, simply select the applicable tab (“Fetching / Before Tasks” or “Post Retrieval Tasks”) and then tasks can be managed from the Data Retrieval Tasks group on the ribbon bar.
For tasks on the Import Template, the “Before Tasks” can be managed on the left group on the ribbon bar (orange) and the “After Tasks” can be managed on the right group on the ribbon bar (blue).
Managing Tasks
Tasks can be removed by clicking the Remove button in the appropriate group on the ribbon bar. The order in which tasks must be executed can also be changed by clicking the Move Up and Move Down buttons in the appropriate group on the ribbon bar.
Existing tasks can be edited by either double clicking on the task or clicking the Edit button in the appropriate group on the ribbon bar.
Note that all the tasks and changes to the tasks (including adding and removing), will only take effect once the overall Import Template has been saved. Should you close the template without saving and open it again, all the tasks will be restored as it was.
Creating Tasks
To create a new task, simply click on the New Task dropdown button in the appropriate group on the ribbon bar and choose the type of task to create. Here are the fields that must be completed:
- Task Name: Friendly / descriptive name for identifying the task and determining its purpose.
- Active: Indicate if the task will be executed or not.
- Stop Process on Error: If an error occurs while executing the task, should the whole import fail or should the error be ignored?
- Purpose: This indicates what the purpose of the task is. The Importer has a Preview Data feature to quickly download the data from the source and preview it in an Excel-like grid.
- If the purpose of the task is for Data Retrieval / Cleanup, then the task must always execute, regardless whether it is for performing the actual import or simply Previewing the data.
- If the purpose of the task is to do processing on the staging table or perform some other data-related in HR Manage, then it will only be executed for actual importing and not for previews.
- Other: The rest of the fields that must be completed based on the type of task that is being created. Note that for filenames and sometimes other fields, it is possible to use date/time tags. A tag consists of a date part enclosed in square brackets.
- [yyyy] = year,
[MM], [MMM], [MMMM] = month,
[dd], [ddd], [dddd] = day,
[HH], [hh] = hour, [mm] = minute, [ss] = second - For instance, specifying the following filename will replace generate a final filename with the tags replaced with values from the current date/time:
“B:\Data\TempFile [yyyy]-[MM]-[dd]_[HH]-[mm].zip - See the fields for the various types of tasks below:
- [yyyy] = year,
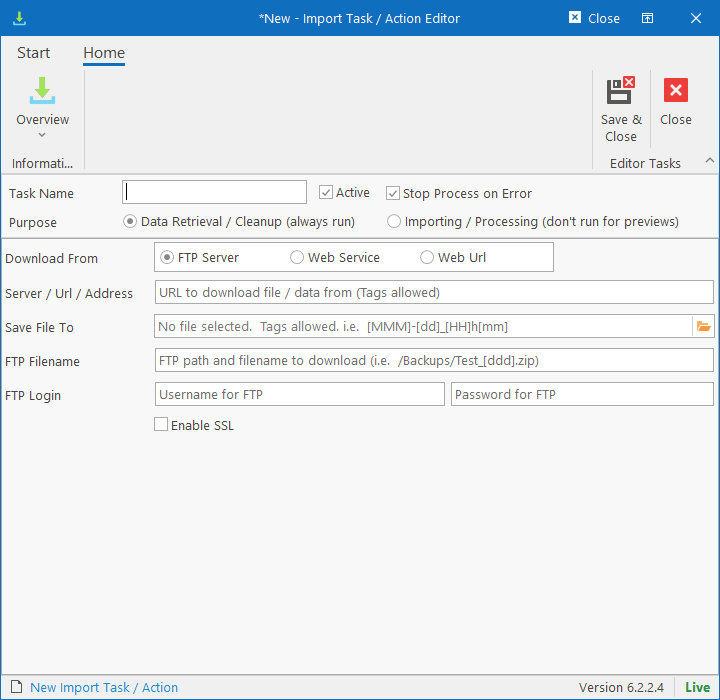
Download File
This will download a file from a website or ftp(s) or simple web service and save it to a file on the server. This would obviously only apply to imports where the execution is set to always occur on the server.
- Download From: Specify what the source for the download will be. FTP Server, Web Service or a file on a website.
- Server / Url / Address: For FTP, this will indicate which server to connect to, otherwise it will be the full url for downloading the file.
- Save File To: This will specify to which location the file must be downloaded to. Date/Time tags supported.
- FTP Filename: Specify the path and filename on the FTP server to download. Date/Time tags supported.
- FTP Login: Specify the username and password to connect to the FTP Server.
- Enable SSL: Specify if the task should connect via ftp or ftps.
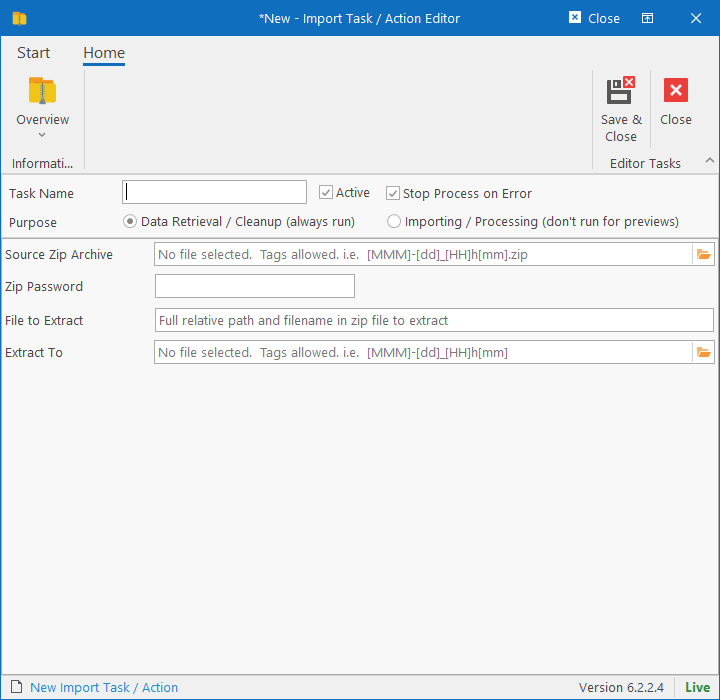
Extract a Zip File
This will extract a file from a Zip archive (which can be password protected) and save the extracted file to a location on the server.
- Source Zip Archive: Path and filename of the zip file that must be extracted. Date/Time tags supported.
- Zip Password: If the zip file is password protected, specify it here.
- File to Extract: Name (and possibly the relative path) of the file in the archive to extract. Only a single file can be extracted per task, so no wildcards.
- Extract To: Specify where to save the extracted file to. Date/Time tags supported.
Execute SQL Script
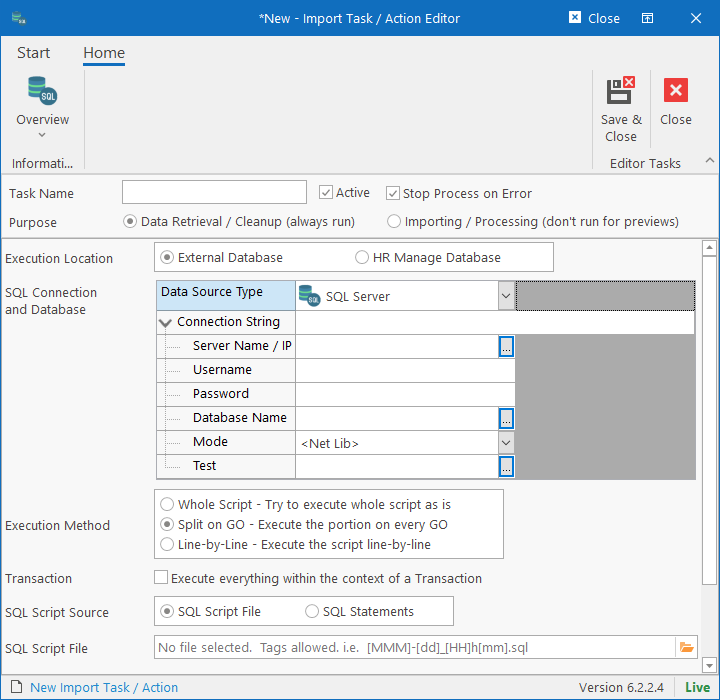
This task will open a connection to a SQL Server database (either custom specified or the HR Manage database) and then execute a script on the database. The script can be loaded from a file or it can be hardcoded in the task.
- Execution Location: Specify if the script must be executed on a specific SQL database or on the HR Manage database.
- SQL Connection and Database: Specify the parameters for connecting to the SQL Server database. Be sure to test the connection afterwards to prevent errors during execution.
- Execution Method: Specify how the script should be processed. Execute everything at once, split it into chunks or execute line-by-line.
- Transaction: Specify whether the whole script should be executed within the context of a transaction. If selected and an error occurs during the script execution, then all changes made by the script will be rolled back.
- SQL Script Source: Specify if the script must come from a filename that must be loaded (Date/Time Tags supported) or if the script is hardcoded and embedded in the task. Depending on what is selected here, the form will either prompt a filename field or a SQL Script field for the next field.
Run a program
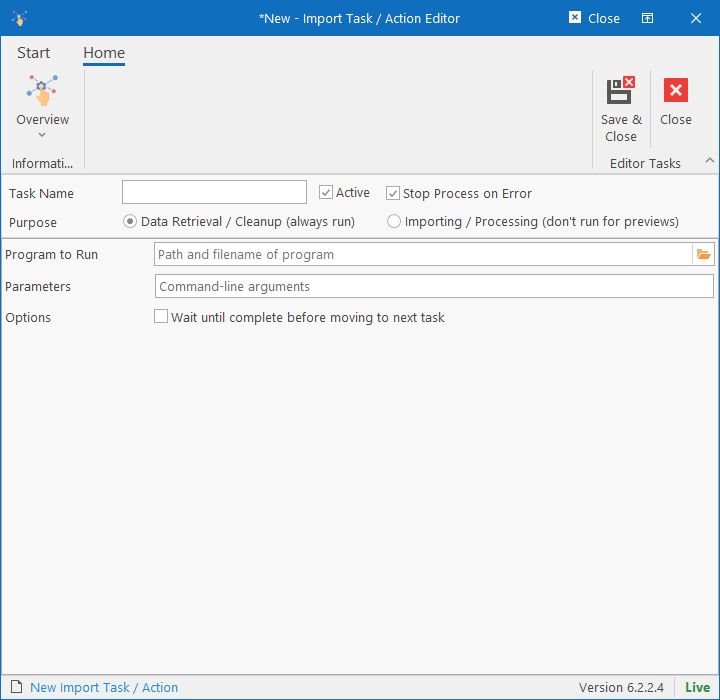
This task will run an executable (i.e. custom developed plugin utility) on the server that can perform custom actions. The executable file must already be present on the server for it to work.
- Program to Run: Specify the path and filename of the program to run. This would usually be a custom developed plugin, but it could also be something like extracting a rar/7z archive (since HR Manage only natively supports extracting zip files).
- Parameters: Specify any command-line arguments that must be supplied.
- Wait for completion: Specify if the task must wait until the program execution has completed before exiting and continuing the import process.
Delete file(s)
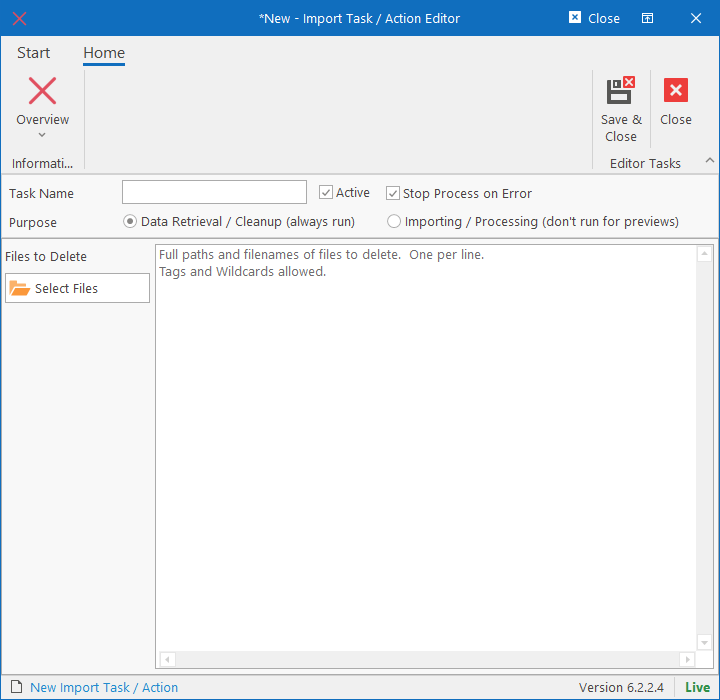
This task will delete one or more files. Useful for cleaning up temporary work files.
- Files to Delete: Specify which files must be deleted. Multiple files can be specified and both wildcards and Date/Time tags are allowed. One entry per line.