
Designing Workflow Templates
Creating or Editing a Workflow Template from the library will open up this Workflow Designer (also known as the Workflow Template Editor).
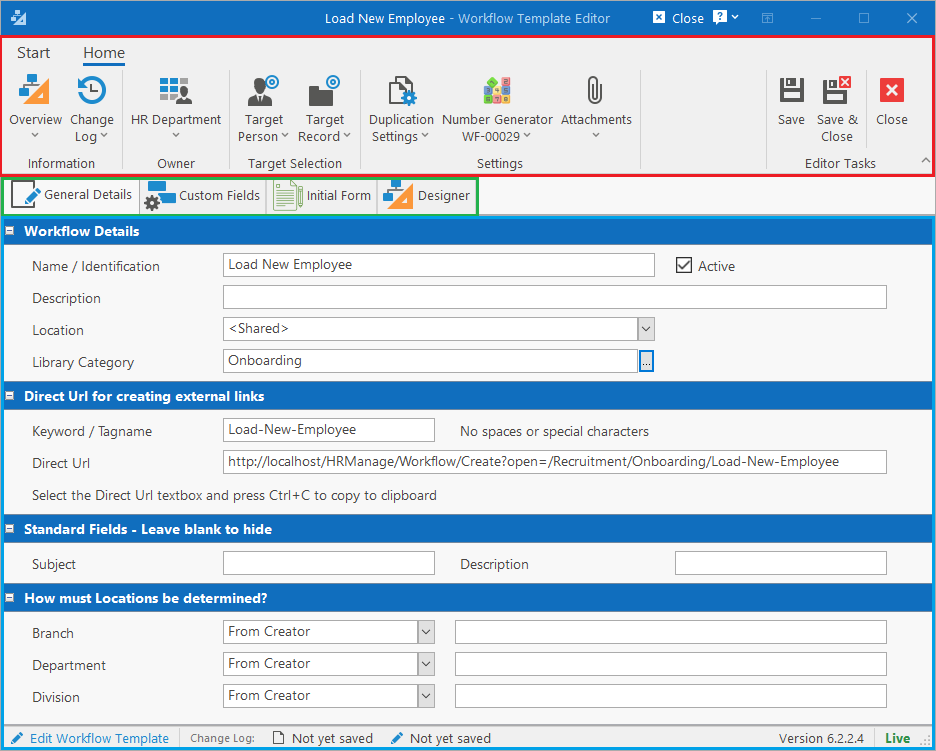
On the editor, there are three sections here to take note of:
- The ribbon / toolbar, marked in red on the screen print
- The tabs for configuring different aspects of the template (green)
- The content area where specific fields and settings are edited (blue)
Ribbon Bar
There are some key settings that must be set for each workflow template on the Ribbon bar which affects the behaviour of the overall workflow.
Responsible Group / Owner
You need to specify which group of recipients will be responsible for overseeing workflows created based on the template being edited.
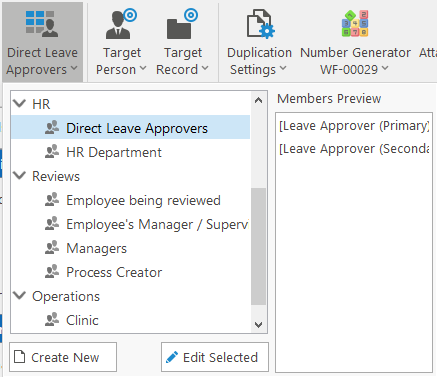
To change, simply click the Owner dropdown menu from the ribbon bar and select a new Recipient Group. While selecting the group, you will see a preview of the members on the right. You can also create a new Recipient Group directly from here.
Target Person
Workflows can be configured to be specifically related to a person in the HR Manage system. For this setting, you can specify where this Target Person must come from or if it is enabled at all. To change, click the Target Person dropdown button in the ribbon bar and choose the appropriate option.
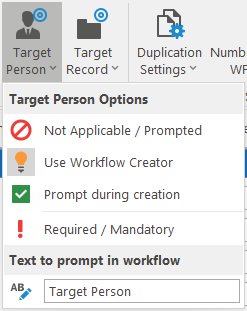
- Not Applicable / Prompted: Workflow doesn’t refer to any specific person.
- Use Workflow Creator: The person who creates the workflow automatically becomes the Target Person.
- Prompt during creation: When creating the workflow, the system will ask the user to select a person either related to them or from the database.
- Required / Mandator: Specify whether the Target Person is optional or required.
- Text to prompt in workflow: Specify the name to associate with the target person. This will be what is prompted in the workflow. Can be “Learner”, “Target Person”, “Injured Person”, etc.
Target Record
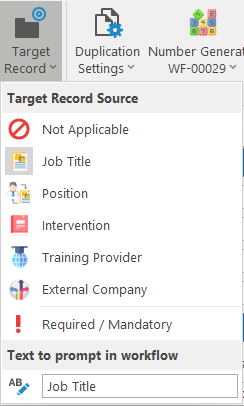
The system also allows the selection of a Target Record in addition to the Target Person. This can be a record from one of the libraries and the system will prompt the selection of it during the workflow creation. Similarly to that of the Target Person setting, you can specify whether or not it is prompted at all and whether it is required or optional.
Duplication Settings
This setting will prevent the same workflow from being created multiple times by checking if another workflow of the same type already exist, combined with the fields selected in these options. The available options are Target Person, Target Record and Creator. Thus Creator and Target Person is selected, if the same person attempts to create a new workflow of the same template for the same target person, the system would block the creation.
Number Generator
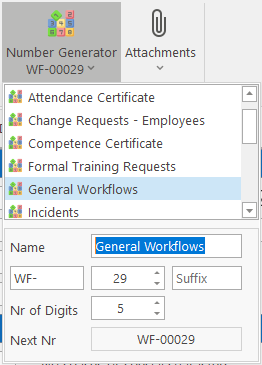
It is possible to generate a unique reference number for each newly created workflow by specifying a Number Generator. Different templates can have their own number range and it can be customised while creating the workflow template. Simply click on the Number Generator dropdown button on the ribbon bar, select an item or create a new one.
Attachments
You can specify the behaviour of generic attachments on the workflow (files that are just attached to the workflow without any additional assignment). Simply click on the Attachments dropdown button from the ribbon bar and choose between “Full functionality”, “Upload & View only” or “No Access”.
General Details tab
This is where the main meta configuration for the workflow template is done. You can give the template a name and assign it to a Category in the library. Here is a summary of the fields that can be completed:
- Name: Specify a unique name for the workflow template used for identifying it.
- Description: Short meta information about the purpose of the workflow.
- Library Category: Will automatically be assigned based on the selected category in the library, but you can reassign it from here. The security on the category will determine to which users the workflow template will be visible to.
- Keyword / Tagname: You can specify a short and unique name that can be used for identifying the workflow. No spaces or special characters are allowed in the name.
- Direct Url: This will generate automatically if the Keyword is specified as well as all the categories that the workflow template is linked to. This will automatically navigate to the New Workflow page if clicked with this template preloaded. This url can then be posted on your local intranet if so desired.
- Subject: This is a standard text field (max 100 characters) that is prompted for all workflows. You can rename the caption for this field or make it blank to remove it completely.
- Description: This is a multiline text field (no character limit) that is prompted for all workflows. You can rename the caption for this field or make it blank to remove it completely.
- Location 1, 2 & 3: All workflows are assigned to a location 1, 2 and 3 at creation in order to make it easier to find and filter workflows. You must specify how each of these locations should be determined:
- From Creator: The location that is assigned to the person who created the workflow will be used.
- From Target Person: The location that is assigned to the workflow’s Target Person will be used.
- Specify: You’ll need to click the ellipsis button on the field to the right in order to select a location from the company structure that all workflows will be assigned to.
- Prompt at Creation: The location field will be an additional field that must be selected from a dropdown when creating the workflow.
Custom Fields tab
On this tab you can specify any custom fields and special fields that must be included in the workflow during creation. You can also drag the fields to specify the order in which they must appear.
- Custom fields are fields flexible fields that can be renamed and included or excluded on a per workflow template basis. They can be managed under the Module Configuration / Custom Fields.
- Special fields are calculated fields that cannot be modified from within the workflow. At creation, the fields are calculated by running a specific query against the database and the result is then stored in the special field. An example would be to retrieve the outstanding study loan amount on a termination workflow.
Initial Form tab
The initial form is a designed form that contains fields and questions that must be completed at the creation of a workflow. It is optional to have an initial form and if specified, you can specify which entries in the form is required. For more help on how to design forms, see the Form Designer.
Designer tab
The workflow designer is where you build the flow of the workflow and add activities. When creating a new workflow and saving the meta data, the “Start of Workflow” and “End of Workflow” activities will automatically be created for you. They cannot be changed or deleted and they serve as the beginning and end of the workflow.
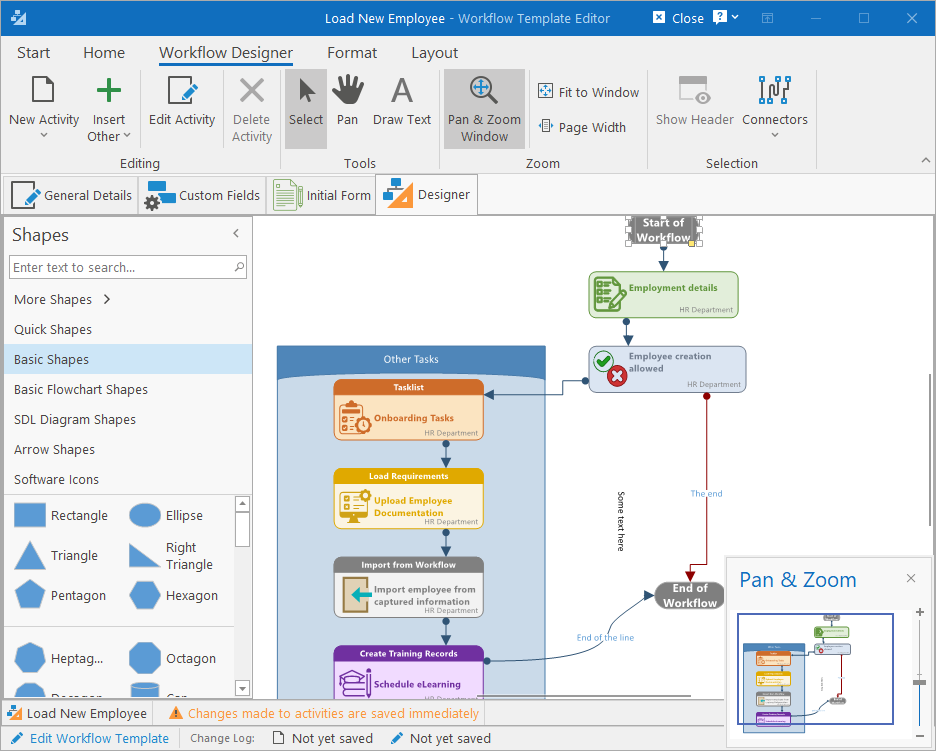
The core of the designer revolve around the management of the activities. We’ll cover this first and then we’ll delve into the design features like formatting, layout and documenting.
Creating a new activity
To create a new activity, select the activity in the designer you want to flow from. If this is your first activity, select the “Start of Workflow” activity. Then,
- Click on the New Activity dropdown button on the Ribbon bar, or
- Right-click on the activity you want to flow from and click on one of the New Activity menu items in the context menu. As a shortcut, you can choose “New On Success” or “New On Failure” from here so that you don’t need to configure it in the Activity editor.
Then simply click the menu item representing the type of activity you wish to create. This will open up the Activity Editor which you can learn more about here.
Workflow Designer Ribbon bar
- New Activity: Dropdown button for creating a new activity.
- Insert Other: This allows you to insert documentation or meta elements into the workflow design. You can insert a picture or a container that you can place activities in to visually group activities together.
Similarly on the left of the window, there is a Shapes toolbox from where you can drag shapes to the diagram for cosmetic or documentation purposes. - Edit Activity: Opens the selected workflow activity. Only enabled when an activity is selected.
- Delete Activity: Delete or set an activity’s status to “deleted” so that it is no longer used in the workflow. Workflows that are currently in progress and using this activity, might become broken.
- Tools: A selection of tools that can be used for working with the designer. The Select tool will select any item that you click on. The Pan tool will drag the whole diagram in the position that you drag it in (simply click anywhere and start dragging). The Draw Text tool will allow you to enter custom text / information, anywhere on the diagram. It can be used for documentation purposes.
- Zoom: Provides a couple of tools for zooming the diagram. There is also a slider on the status bar (bottom-right corner) that can be used for manually zooming in and out.
- Selection / Show Header: All activities have headers, but they can be show or hidden. By default, only the obvious system activities have their header hidden (Forms, Sign off and Decisions) while the rest are visible. With this setting, you can change that. This also applies to selecting Container items.
- Selection / Connectors: When selecting a connector, this will become enabled and allow you to change the type of the selected connector. Options are “Right Angle” (default), “Curved” or “Straight”.
Format Ribbon bar

The format ribbon bar allows you to change the font, styles, colours and more of the selected item. You can also arrange the ZOrder by sending items behind other items or bringing them to the front of other items.
All these options are purely cosmetic and doesn’t influence the actual flow of the workflow.
Layout Ribbon bar

The layout ribbon bar also deals with cosmetics, but are mostly concerned with ordering the page. From here, you can automatically re-layout the entire diagram in one of the predefined layouts and also set custom page properties like page size, orientation, ruler, margins and anything else related to making the workflow printable. The diagram can also be printed from here or exported to Pdf, Png or Jpg.