
Creating Import Templates
Due to our system being flexible enough to integrate with almost any payroll, creating Import Templates can be quite complex. For integration with our partner payrolls, we’ve simplified the process a bit by providing a “Quick Payroll API Configuration” wizard.
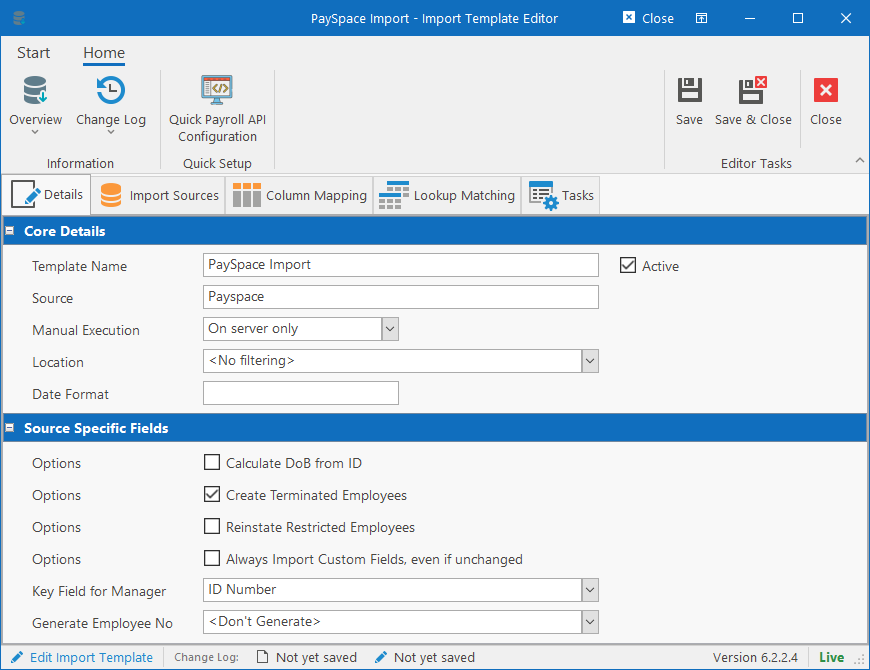
From the HR Manage Importer, open an existing template or click on New Template to open this Import Template Editor.
Quick Configuration Wizard
If you’ll be integrating with one of our partner payrolls, you can simply click the Quick Payroll API Configuration button on the ribbon bar. This will open a wizard to guide you through the initial part of the configuration, greatly reducing the time and technical skills required to get started. The available partners are (click for more information):
- Sage 300 People
- PaySpace
- SimplePay
Configuration Tabs
The import template has various aspects that need to be configured. The different configuration areas are managed in each of the tabs on the template editor:
- Details: Basic details and behaviour for the import template. See information about each of the fields on this tab below.
- Import Sources: The data source(s) that must be imported from are specified here. A template can collect data from multiple sources and combine it into a single source before importing. For more information on how to configure the Import Sources tab, click here.
- Column Mapping: Each field in HR Manage that will be imported, needs to be mapped to a field in the source data. To learn more on how to configure, click here.
- Lookup Matching: When importing fields that are lookup tables in HR Manage, we can’t just import any junk. Thus, imported values need to be matched to HR Manage lookup values. To learn how, click here.
- Tasks: Only for IT professionals, preferably from People Resolutions. Sometimes some of the data received from a payroll or 3rd party needs to be cleaned. This can be done by executing custom scripts on the staging table or running a small custom utility to make modifications to the data or perform some custom task. This can be accomplished in the form of custom Tasks that can be added to an Import Template. To learn more, click here.
Details tab
Core Details
The details tab contains the main identification and overall behavioural information for the import template. Here are the available fields.
Template Name & Source
The Template name is a unique name used to identify the template in the library. The Source is the name of the payroll or system that is being imported from. This is just informational and not specifically used by HR Manage.
Manual Execution
Specify where the import must take place when performing the import. The available options are:
- On any computer: The import will run on whichever computer the import is started from. This is mostly used when importing from exported files located on the user’s own computer or from data sources that everyone’s computer has access to (i.e. SQL Server on local network).
- On server only: The Importer will simply send an instruction to the server to start the import process and the whole import process will run on the server. This is the preferred option and used especially in situations where the data source can only be accessed from the server or when there are more complex tasks involved like first downloading the data from a FTP site.
Location
Specify what isolation filtering to apply when importing for multiple payrolls where multiple companies are hosted on the same instance. For companies only importing from one payroll and even for most companies importing from multiple payrolls, leave this option on “<No filtering>”.
The main effect that this setting has is on employee identification and this is only used in special cases where clients request this behaviour. When importing employees, each employee is checked to see if the person already exists on HR Manage. If the person exists, they are updated and if not, they are created. To explain by example, if you are importing employees and an employee on HR Manage is currently assigned to “Limpopo” and on payroll they are assigned to “Gauteng”, the importer will behave as follows depending on the Location selection:
- If the Template’s Location is set to “<No filtering>” or even the main company name:
- Then the existing employee in HR Manage will be updated.
- The employee’s current occupation will be set to inactive
- A new occupation will be created where the employee is then reassigned to “Gauteng”
- If the Template’s Location is set to “Gauteng”:
- The dataset that the importer examines in HR Manage will be limited to “Gauteng”. Since the employee is currently assigned to “Limpopo”, the employee will not be found.
- A new employee will thus be created under Gauteng, essentially causing a “duplicate” employee on the system.
- A subsequent “Limpopo” import will then set the existing employee assigned to “Limpopo” to terminated, probably with “Transfer” as the reason for termination.
Date Format
When importing date field from text sources (i.e. CSV) or even proper sources like SQL, XML and Excel, but where the date is stored as a string, then you should specify the format in which the date is stored so it can be extracted by HR Manage.
You can build a date format by using a combination of the following tags (they are obviously case sensitive):
- yyyy = year
- MM = month
- dd = day
- HH = hour
- mm = minute
So when receiving a date from SAP like “2020.05.10”, you can specify the format as “yyyy.MM.dd” and HR Manage will recognise it. This setting can be customised for each field in the “Column Mapping” tab, but if it is left blank on there, then this format will be used.
Note that when importing from Excel, XML, Json, SQL Server and Web API, we would usually receive strongly typed dates which means you can leave this field blank (unless the dates are stored / exported as strings).
Source Specific Details
These options are specific for importing Employee data. For importing other types of data, there will be different fields that apply to that.
Calculate DoB from ID
If selected, then for each person imported with a South African ID Number, their date of birth field will be calculated from the ID Number and updated.
Only applies to South African citizens with an ID Number.
Create Terminated Employees
This will import terminated employees and create them in HR Manage if they don’t already exist. If not selected, then only employees already in HR Manage will be updated and their status changed to terminated.
Reinstate Restricted Employees
If an employee is imported from payroll but marked as restricted in HR Manage, if this option is selected, it will import or re-activate the employee. If not selected, then the import for the employee will fail with error message “Restricted employee”.
Always Import Custom Fields, even if unchanged
When importing employees, the importer first check if any of the biographic or occupation fields have changed since the last import. If anything has changed, then the employee is imported again. If not, then the import record will simply be marked as “Checked Only”.
This check however does not extend to the custom defined fields as it would take too much processing. Thus if a custom field has changed and nothing else, then the record won’t be updated.
Selecting this option will always re-import the record regardless of whether any field has changed, thus ensuring that any custom fields that might have changed will also get updated.
Key Field for Manager
When a field in the payroll source is provided for the employee’s manager, it can be one of a couple of values that are provided (this is usually payroll dependent). In this setting, you can specify which field of the manager was provided for the field mapped to the “Manager” column in the “Column Mapping” tab.
Available fields to choose from are: “ID Number”, “Employee Number”, “Unique Number” or “HR Manage Internal Key”.
Generate Employee No
In some cases, clients want HR Manage to generate an employee / reference number for newly imported employees. In that case, you can select a Number Generator here that will determine the format and sequence for the generated employee number.