
Lookup Matching
Introduction
HR Manage has lookup tables, setup tables and libraries that contain a wealth of information that automatically gets linked to employees when they are linked to them. Due to payrolls having either different lookup tables or being free text, there is a need to know how to handle incoming values that are lookups in HR Manage. For that, we use Lookup Matching. After each import, the raw values will be imported that can then be matched to lookup values in HR Manage. When importing and encountering a value that is not matched, the Importer will either use the default value provided or fail, depending on how the field is configured in the template.
Lookup Matching tab
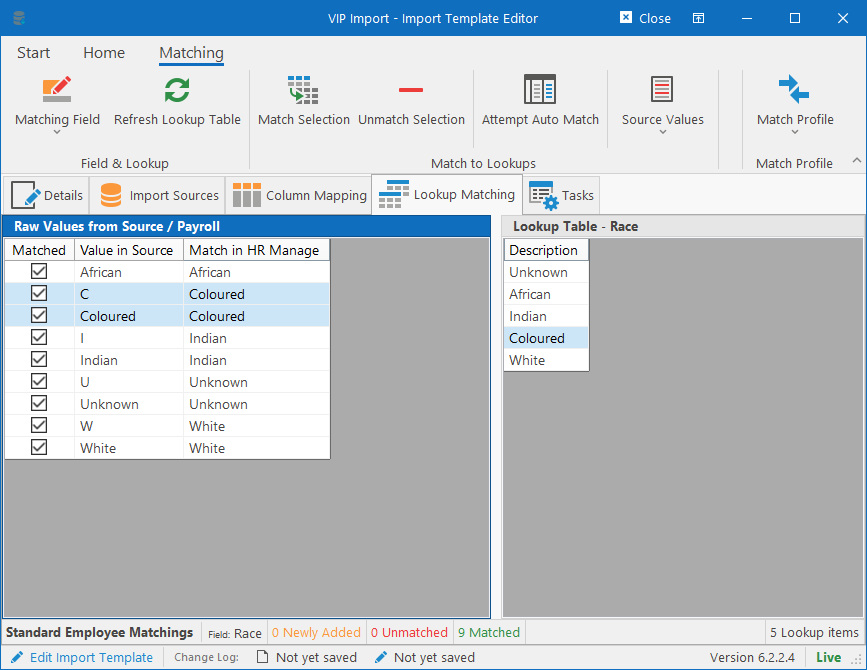
The Lookup Matching tab on the Import Template Editor is a place where Matching Profiles can be configured. You can either create a new matching profile or use an existing one, but for most cases, simply sharing a single one is sufficient. Alternatively, you can also access the matching profile from the Import Results screen by simply double-clicking on an unmatched value. This will open up the Matching Profile with the raw value selected and the lookup table open, ready to match on-the-fly.
The area consists of 3 areas:
- Ribbon Toolbar at the top that contains actions that can be performed on the selected items and and the overall Matching Profile.
- Raw values and their matched values in the list on the left.
- Lookup Table on the right to match the selected values on the left with.
Getting Started
Just one thing to note about saving changes. If you are accessing the matching profile from the Import Template Editor under the Lookup Matching tab, all changes that you make will only be saved once you save the Import Template. However, if you are accessing the matching profile from the Match Lookups tab in the Results Explorer, then any changes you make will immediately be saved (since everything done on the Results Explorer is immediate).
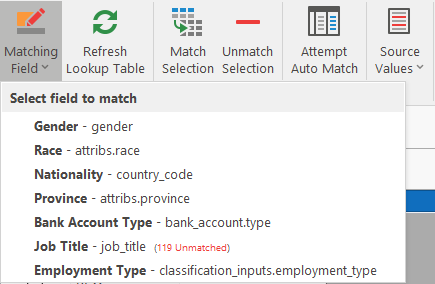
Either way, to get started, click on the Matching Field dropdown button on the left of the ribbon bar. This will reveal all the fields included in the import template that requires matching and it will display the name of the field in HR Manage as well as the name of the field in the payroll. Select one of the fields to get started.
Matching a value
There are various methods to match values, but the basic concept is to select one or more values in the left list of raw values, then select the value in the right lookup table to match to and then click the Match Selection button on the ribbon bar or pressing Enter or double-clicking on the matched value in the lookup table on the right.
Note that if you arrived at this matching profile by double-clicking on an unmatched value in the Results Explorer, matching the value will return you back to the Results Explorer tab and apply the matching to the raw value you just matched for all records in the results.
Unmatch a value
If for some reason, you want to remove a match from a raw value, simply select the raw value that is currently matched and click the Unmatch Selection button on the ribbon bar or press the Delete button on your keyboard.
Delete a raw value
If you need to delete a raw value on the left, you can select the value (or values) and then click on the Source Values dropdown button on the ribbon bar and then click on the Delete Selected Raw values menu item (also accessible by right-clicking on the items). Alternatively, you can select the items and press Ctrl+Delete on your keyboard.
Do however take note that if the raw values you deleted, are still being imported from payroll, then they will be recreated in the matching profile during the next import.
Attempt Auto Match
In the event where the names of the items on the payroll is the same as the names of the lookup items in HR Manage, you can click on the Attempt Auto Match button which will automatically match raw values to a lookup item with the same name.
Create Lookup Items
If you wish to just convert the raw values as-is to lookup tables in HR Manage, you can select the raw values in the list on the left and then click on the Source Values dropdown button in the ribbon bar and then click on the Create Lookup Items menu item. This might not be ideal and it might not work for all lookups (i.e. certain lookups like Race and Gender are fixed / read-only).
Working the Lists
Basics
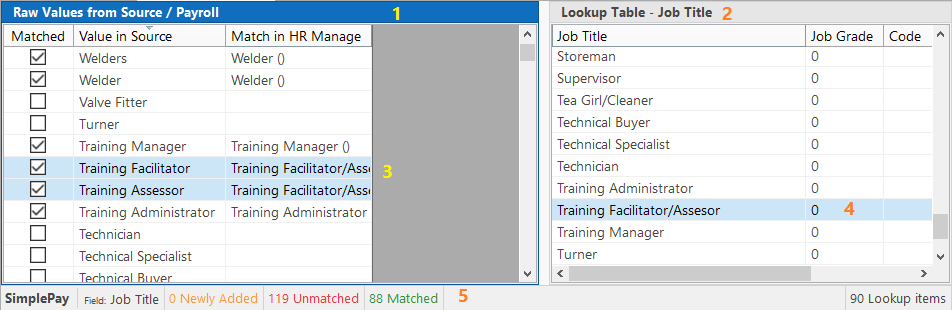
The list on the left contains the raw values from the payroll (and which value they’ve been matched with if matched) and the list on the right contains the lookup / setup / library table in HR Manage to match the raw values to. Both these lists can be filtered, sorted and searched.
Sorting, Filtering and Searching
To sort, simply click on any column. To sort in the opposite direction, click the column again.
To filter, move the mouse cursor over a column header until a dropdown arrow appears on the right of the column, then click on that arrow to open a popup where a search string can be entered.
To search, simply click on one of the values in the column you want to search and just start typing. The cursor will automatically move to the best match.
Concepts and Keyboard shortcuts
When a list receives focus, it’s header turns blue (or whatever the theme colour is) while the other list’s header will change to the default colour. In the image above, the list with focus is marked at point 1.
In the header of the lookup table (point 2), the name of the lookup table is shown and in statusbar at point 5, the statistics of the lookup field is displayed (how many unmatched, how many matched and how many newly added unmatched in the last imports).
Now the system has a shortcut to quickly match a value (or values) using the keyboard. Whenever you press the enter key on one list, it will move the focus to the other list. Thus in the sample image above, to match values, select the two values on the left and press Enter (this will move the focus to the right), then select the value on the right and press Enter again (this will match the selected value to the raw values on the left and move the focus back to the left).