
Manager Forms
Introducing the Basics
Manager Forms are used for filtering, listing and managing records for each type of entity within HR Manage.
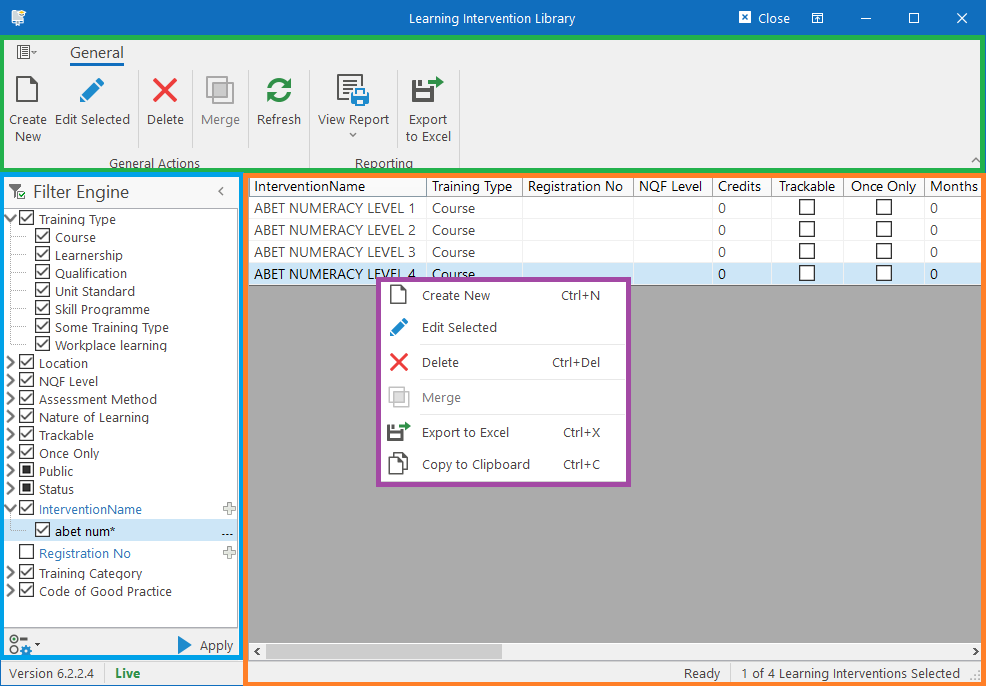
Each Manager Form consists of the following elements:
- Ribbon / Ribbon bar: Contains the available actions that can be performed.
- Filter Engine: Used for setting parameters to limit the number of records retrieved from the server. The more specific the filter, the quicker the response from the server.
- Records List: Contains the records that was retrieved from the server. Can be selected, managed and even filtered further with the use of column filters.
- Context Menu: Pops up with context specific actions when right-clicking in the Records List.
Using the Filter Engine
See the Using the Filter Engine article for more information.
Using the Records List
Selecting Records
Records can easily be selected from the Records list by simply clicking on a row. Select another record by holding down the Ctrl key and clicking on more rows. You can deselect a row by simply clicking on it again with the Ctrl key still down.
To select multiple records that are directly next to each other, simply click on the first record while holding down the left mouse button and then drag to the last record and release the button.
Using the keyboard, you can use the up and down arrow keys. If you hold down the Shift key, it will select more records as you press up or down. If you hold down the Ctrl key and press the up or down arrow key, the cursor will jump to the first or last record in the list. Thus selecting the first record, holding down Ctrl+Shift and then pressing the Down arrow key, will result in the entire list being selected.
Filtering Records
The Records Listing control has built-in filtering functionality that will filter the list of records without making a call back to the server to retrieve a refreshed list. Move the mouse cursor over one of the column headers and a dropdown arrow will appear on the right side of the column header. Clicking it will display a popup to filter the list. The exact filter that will display will depend on the type of column that is being filtered on.
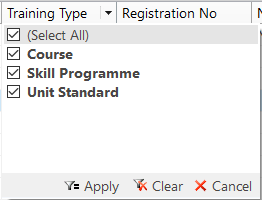
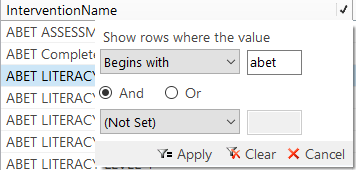
Note that this filtering method works by simply hiding the other records. If you export this filtered list to Excel, you will be able to resize the hidden rows to make them visible again.
Managing Records
Creating a new Record
In the Manager form, simply click the Create New ribbon bar button. Alternatively, right-click anywhere on the list of records and click Create New from the context menu.
Continue on the applicable Record Editor.
Opening / Editing an existing Record
On the list of Records in the Manager form, simply select the specific record you wish to open and:
- Click the Edit Selected button on the ribbon bar, or
- Press the Enter key, or
- Double-click the position, or
- Right-click the record and click the Edit Selected item from the context menu.
Continue on the applicable Record Editor.
Updating multiple Records in a batch
This doesn’t apply to all manager forms. Some records don’t have the functionality to be updated in a batch. In those instances, the Edit Selected button will be greyed out or will simply be unresponsive when clicked on.
For records that do support batch updating, simply select the records you wish to update and:
- Click the Edit Selected button on the ribbon bar, or
- Press the Enter key, or
- Right-click the record and click the Edit Selected item from the context menu.
The Batch Record Updater for the applicable records will open.
Deleting one or more Records
Select the record(s) that you wish to delete and:
- Click the Delete button on the ribbon bar, or
- Right-click one of the selected records and click the Delete item on the context menu, or
- Press the Ctrl+Del keys on your keyboard.
This will open the following “Delete confirmation prompt”. This might look slightly different depending on the type of records being deleted, but generally, it will consist of:
- List of records that will be deleted
- Ribbon bar consisting of the following groups
- Removing items from the to-delete list (or exporting the list)
- Choosing the “Action to Perform”. You must specify an action to perform before the “Perform Delete” button will become available.
- In some instances, when choosing “Cancel / Set Inactive”, you might be prompted for a reason and/or date.
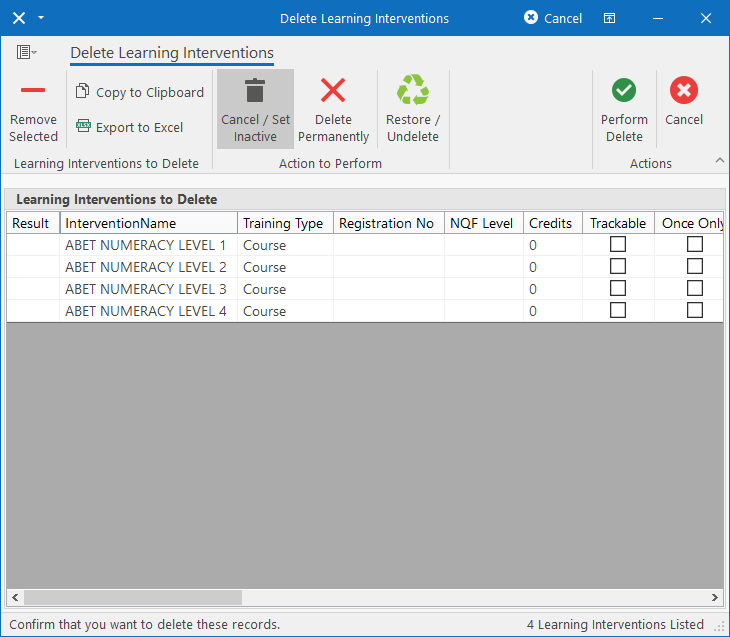
Clicking the Perform Delete button will attempt to delete each record and display the result of that attempt in the first column in the list. If there were no errors and all records were successfully deleted, the dialog will close after completion.
Merging two or more records
This doesn’t apply to all manager forms. Some records don’t have the functionality to be merged. In those instances, the Merge button will simply be hidden.
Select at least 2 records and click the Merge button on the ribbon bar or right-click on one of the records and click the Merge item from the context menu. This will open the “Merge Records” confirmation prompt.
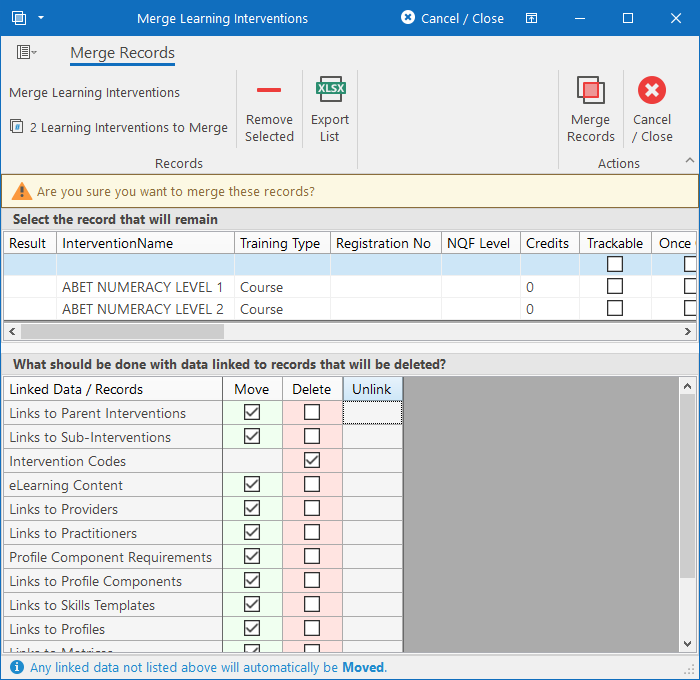
This dialog consists of two main sections:
- The list of records to be merged, of which one must be selected that will become the primary (the record that will remain).
- The list of actions to perform on all the related records for the records that will be deleted.
Once the primary has been selected and all the options for related records have been set, simply click the Merge Records button on the right in the ribbon bar to complete the operation.
Reporting
View Report
Select one or more records and then click the View Report dropdown button on the ribbon bar and choose the report to generate. The report will then generate in a viewer from where it can be emailed or exported to a format of your choice.
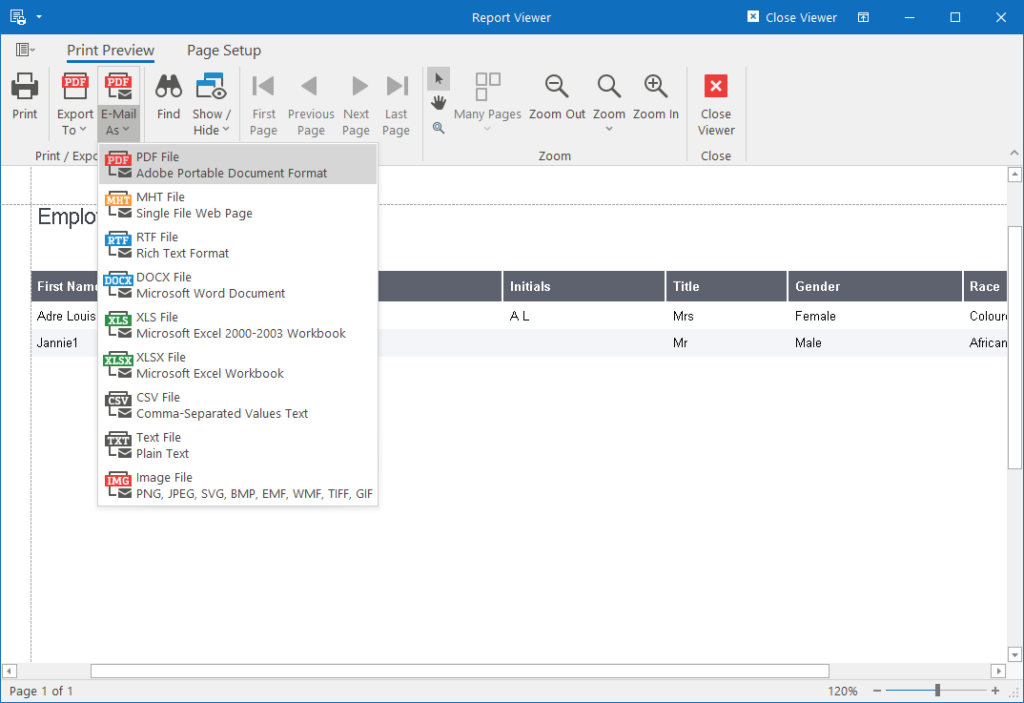
The reports for this list can be designed in the Module Configuration area.
Export to Excel
Clicking the Export to Excel button on the ribbon bar will generate an Excel Worksheet based on the current listed data. You’ll be presented with a prompt to specify parameters.
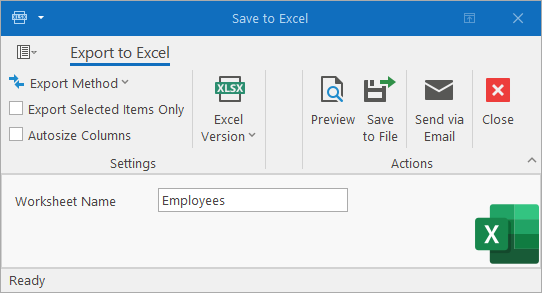
By default, all records in the list will be exported to an Excel 2019 workbook. These defaults can be changed on the confirmation prompt from where the following actions can be performed:
- Preview: Will open the internal Excel-like Workbook Viewer from where the file can be edited and saved to a file. This will work on any computer, regardless of whether or not MS Office is installed.
- Save to File: Will prompt for a location to save the file to and once saved, it will again prompt whether or not to open it in Excel.
- Send via Email: This will create a new email message with the Excel workbook attached and then opened in your default email client, ready to send.