
Decision
This page only contains the details with regards to this creating or editing this specific type of activity. You should already have a basic understanding of how to create and edit workflow activities in the Workflow Designer.
Click here for the guide on how to do that.
Purpose
The Decision activity automatically chooses the path a workflow must follow based on the information captured so far. It evaluates a list of rules that you define and the first rule that matches determines what happens next: the workflow can continue down its True or False path, jump directly to any other activity and people can be linked into a Participant Group (for example, adding the Target Person’s manager to the group that must approve the next step).
A Decision is a system activity: it starts, evaluates and completes in an instant without any user involvement. Unless the activity is marked as visible, users will never see it, only its effect on where the workflow goes.
Note that from version 7, the old “Decision (Link People)” activity has been incorporated into the Decision activity and is no longer separate.
Creating a Decision Activity
Add the activity to the workflow template like any other and link it to its previous activity. The editor consists of the standard Activity Information tab and the Decisions / Rules tab.
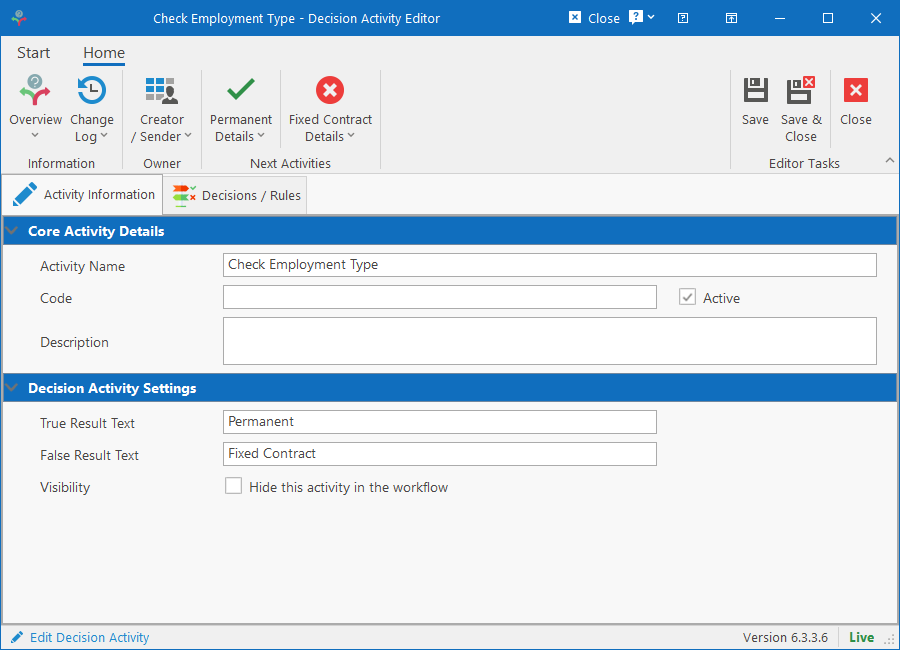
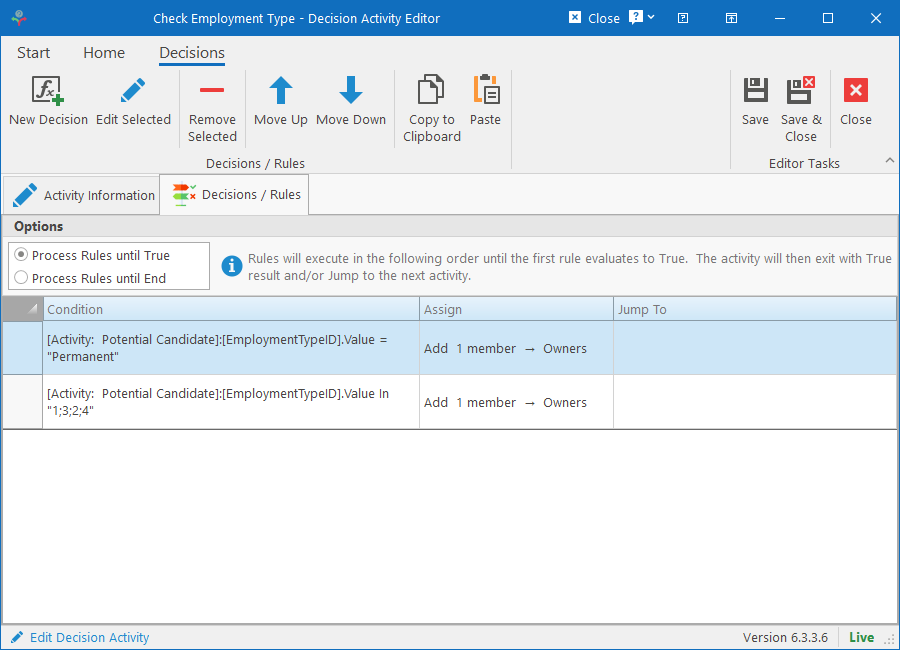
The available settings are:
- True Result Text & False Result Text: Specify the label on the connector line in the designer and the status text on the completed activity in the workflow (if visible).
- Visibility: Specify if the activity should be shown or hidden on the live workflow. If hidden, only the effects of the Decision Activity will be seen.
Decisions / Rules
The Rules tab consists of the execution options and rules grid. The grid contains the rules that will be evaluated in the listed order and the options panel will determine what to do once a rule evaluates to “True”.
The available options are:
- Process Rules until True: Rules will evaluate in the listed order until the first rule evaluates to True. The activity will then immediately exit with a True result and/or Jump to the next activity. The rest of the rules not yet evaluated will be skipped.
- Process Rules until End: Rules will evaluate in the listed order from beginning to end. Where configured, participants will be assigned on every rule that evaluates to True. After the last rule has been evaluated, the first “True” rule that contains a “Jump To” action, will be executed, otherwise the activity will complete with a True result if any rule evaluated as true, otherwise complete with a False result.
From the Ribbon bar, you can add new rules, edit existing rules, change the rule execution order and copy/paste.
Building a Rule
On the Decisions / Rules tab, simply click New Decision in the ribbon bar to open the Decision Rule Editor.
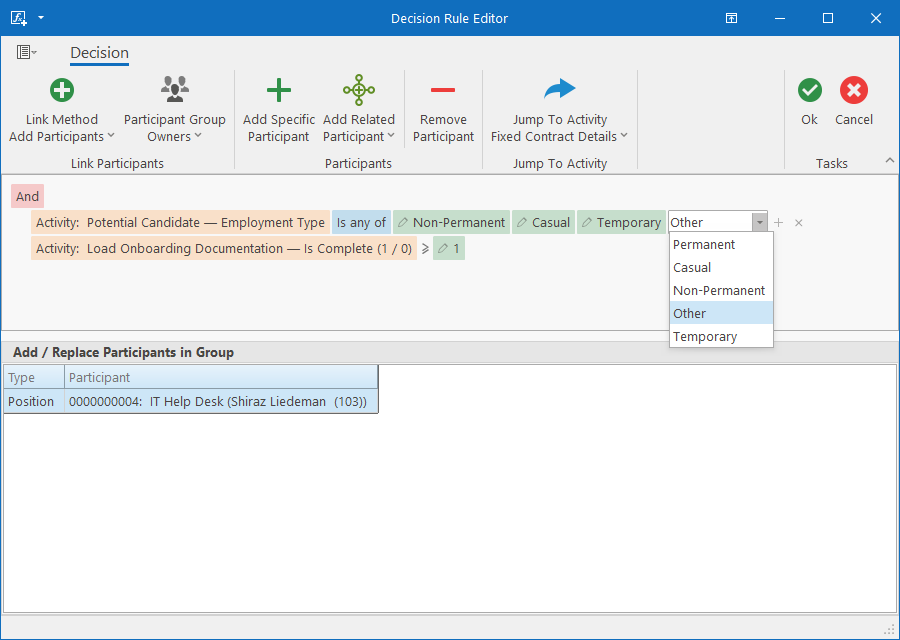
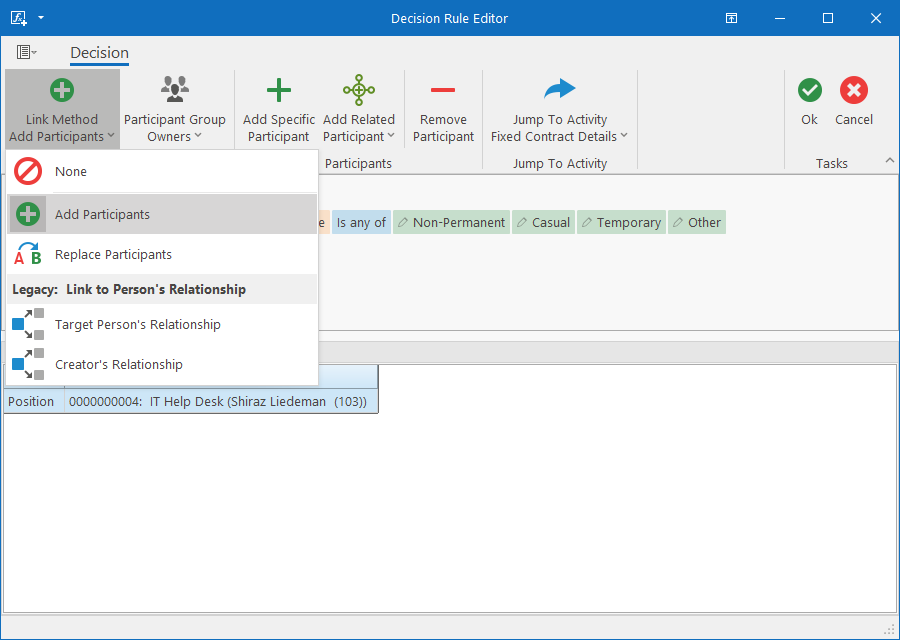
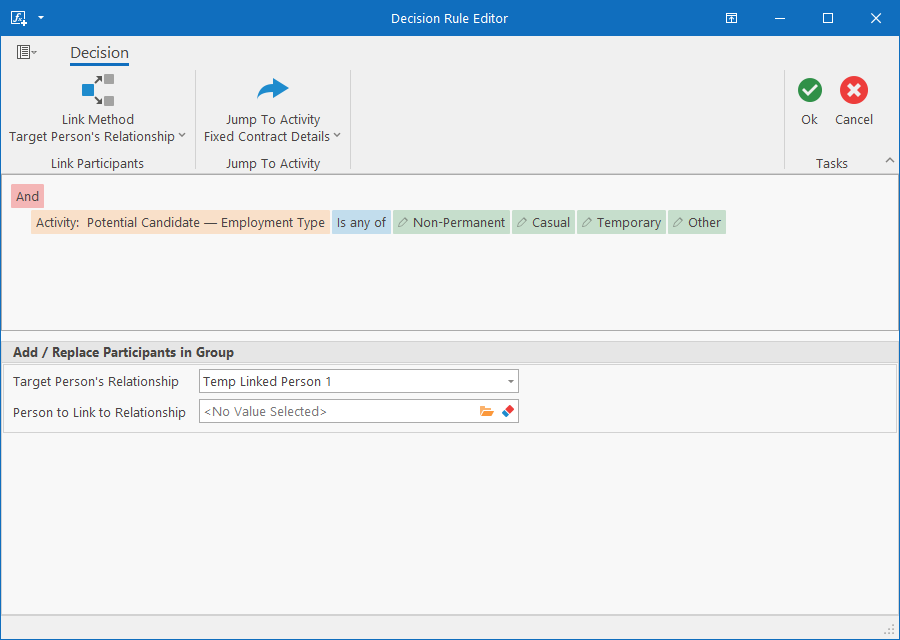
The Rule Builder consists of 3 parts: The Conditions and optional Jump and Participant Linking.
Conditions
Conditions are built with a visual filter: click to add a condition, pick the field, the comparison and the value to compare against. Choice fields offer their actual options in a dropdown, so you select the value rather than type it.
A rule’s conditions are combined in one of two ways: all of them must be true (And) or any one of them (Or). If you need a mixture (“this and that, or those two”), use separate rules. Because rules themselves act as alternatives, several And-rules stacked above one another naturally express Or-of-And logic.
The comparisons available depend on the type of field, and include the usual equals / not equal / greater / less, text tests such as Contains, Begins with and Is blank, list tests such as Is any of, ranges (Is between), and a rich set of date tests like fixed windows such as Is today, Is this month and Is year to date and rolling windows such as within the last N days, within the next N days and older than N days / years.
What can be compared
The fields offered as conditions come from everything that precedes the Decision in the flow:
- The workflow itself: name, status, created / started / completed dates, attachment count.
- The parent record: reference number, description and dates; for Incident and Review workflows, the module’s own fields (incident type, priority, review schedule, and so on).
- The Initial Form’s fields and each preceding activity’s form fields.
- Each preceding activity’s progress: its status, whether it has started or completed, its start and completion dates, and any comments captured on it. This is how you branch on how an activity ended, for example routing differently after a rejection.
Form fields expose more than just the answer. A choice field can be tested on its selected option, the option’s code, its display text, its score or its average score across responses; a text field can also be tested on its length. Rating and number fields compare numerically and date fields unlock the date comparisons.
Jump To Activity
Set Jump To Activity on a rule to send the workflow straight to any activity in the template when that rule fires and evaluates to True, instead of following the True path. The jump is drawn on the workflow diagram as its own connector, so the possible routes stay visible. Use None / Don’t Jump (the default) for rules that should simply produce a True result.
Any activity in the template can be the target except the Start boundary and the Decision itself. Two targets are worth highlighting:
- Jumping backwards to an earlier activity repeats a portion of the workflow and useful for “send it back for correction” loops
- Jumping to the End boundary (or later activity) short-circuits the rest of the flow and completes / advances the workflow immediately.
Linking Participants to a Group
A rule can place people into one of the template’s Participant Groups when it fires. This is how a Decision changes who is responsible for later activities, not just which activities run. Choose the Participant Group and specify the link method:
- Add Participants (join the existing members) or,
- Replace Participants (the group becomes exactly this list)
Then simply build the list of participants:
- Add Specific Participant: a particular person or position.
- Add Related Participant: a person related to the workflow: the Target Person’s, the Creator’s or the Workflow / Org Unit’s relationship, such as their Manager. Related participants are resolved when the rule fires, so the rule stays correct as people change roles.
Legacy Support: Decision (Link People)
The behaviour of the legacy activity can still be used by specifying the Link Participants option to Target Person’s Relationship which will prompt you to select the relationship type and person to link to that relationship. It is however advised to rather start using the purpose built Participant Groups instead.
Tips and Behaviour Worth Knowing
- Link the Decision into the flow before authoring rules. The fields offered are those of the activities before it; a Decision not yet connected to anything offers every activity’s fields, which narrows down once its position is set.
- An empty Decision goes False. If no rules exist or none matches, the workflow simply follows the When Result is False path: nothing blocks or errors.
- Editing a rule later: if a field a saved rule refers to has since been removed from its form, the rule editor will warn you that the affected condition will be removed when you save.
- Use Decisions for routing, IF fields for wording. When the only difference between paths is the text of a generated letter, you do not need a Decision and multiple Generate Document activities — a single template with conditional paragraphs handles it. See the Generate Document article’s Advanced: Conditional Paragraphs with IF fields section.
- Reckless Design can break workflows. When creating a bad design that essentially cause infinite loops (A -> B -> C -> A, all unattended), it will cause the workflow engine to stop processing the workflow and the workflow won’t be able to proceed further.