
Designing Pdf AcroForms
Introduction
Pdf AcroForm Templates are designed on top of an existing Word or Pdf document in the document library. This includes documents that would normally be generated in which case, a blank version of the generated document should be loaded so that a Pdf AcroForm can be designed for it.
The Pdf AcroForm consists of Fields and Roles. A field represents a box (textbox, dropdown, checkbox, initial box or signature box) that will be placed on the Pdf document that must be completed by the signer. The Role is a placeholder for the person who must complete the fields (each field is assigned to a role).
Getting Started
Open the Word or Pdf Document that you would like to create a Pdf AcroForm for. On the “Pdf AcroForms” ribbon bar group, click the Open AcroForm dropdown button and choose which template to open (to open an existing one), or click on the New AcroForm button to create a new template. This will open the following editor form.
Pdf Form Details
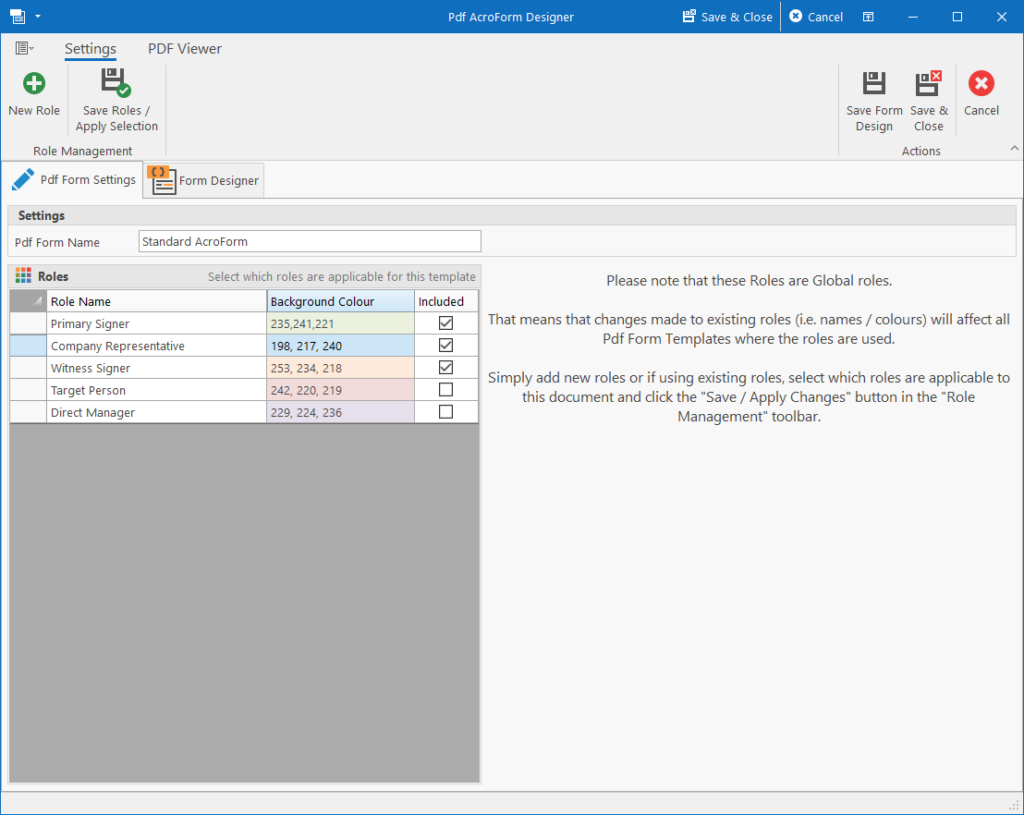
Since there is usually only one AcroForm per document, the name will already be prefilled with the name “Standard AcroForm”. Feel free to rename it if needed.
Then you need to specify the roles that will be involved in this document. The list of roles here are shared between all Pdf AcroForms so take note that whatever you rename here, will affect all other forms. For each role you can specify a name, a background colour and whether it is included in this specific Pdf AcroForm or not applicable. Be sure to choose light background colours here since the fields on the form will be this colour and darker colours might make it harder to read the contents.
You essentially need to define or select a role for each person that must sign the document. Once you’ve selected all the roles that applies to the AcroForm, click the Save Roles / Apply Selection button on the ribbon bar. This will then automatically move to the “Form Designer” tab.
Form Designer
On the form designer, you’ll place all the input fields that need to be completed by the various parties. The tab will show the Pdf document with all the fields that need to be completed. Each field will have the same background colour as the role that it is assigned to and each field will either have a red border (required) or gray border (if the field is optional).
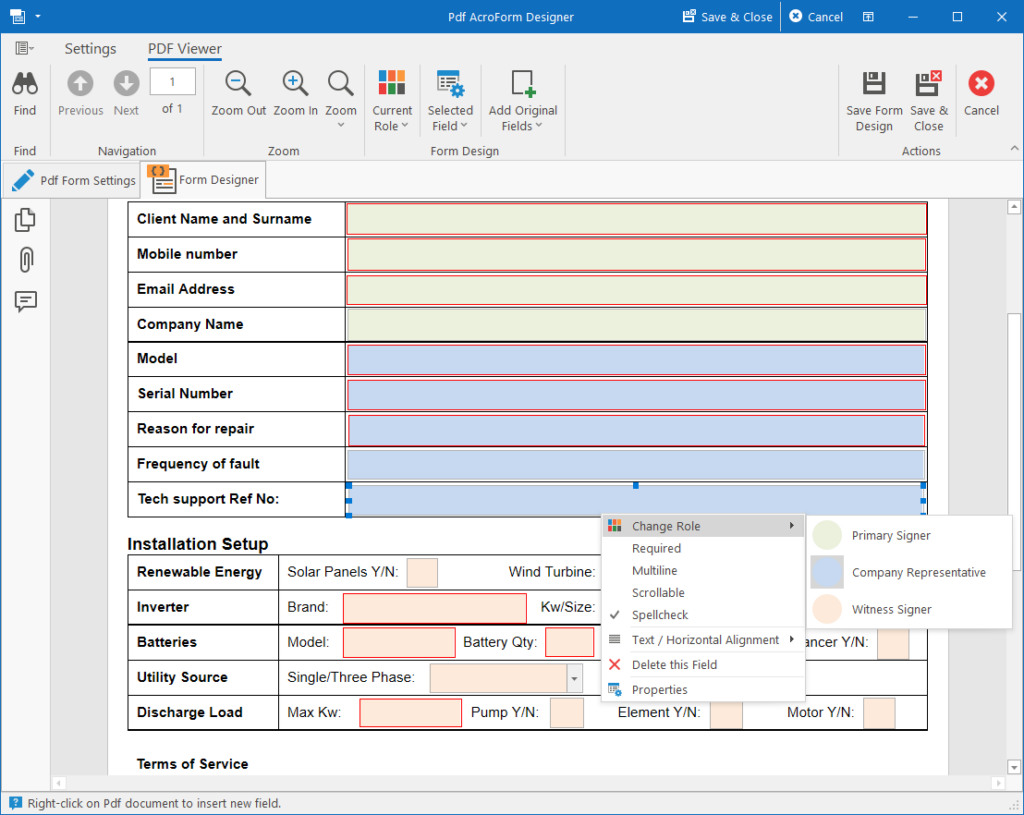
Ribbon bar
The ribbon bar contains the basic document navigation and zoom functionality to quickly navigate through the pages of the document. Then there are also the following actions:
Current Role (dropdown button)
This will display the roles that apply to this AcroForm. Click one of these roles to set the current / active role. When adding new fields to the AcroForm, they are by default assigned to the Current / Active role. They can of course be reassigned, but it is less work and clicks to use this functionality instead.
Selected Field (dropdown button)
This will display the same context menu that you would have gotten had you right-clicked on a field. This button only becomes available when a field is selected.
Add Original Fields
Some Pdf Documents already have AcroFields defined within them. When loaded into this AcroForm Template Editor, all those fields are removed from the document. This dropdown button will list all of the fields that were removed from the current page and allows you to select one or more of those fields and add them back to the document to their original positions. The fields added back will be assigned to the current / active role.
Form Designer
Most of the form designing is done via right-clicking on the document. To create a new field, simply click on empty location in the document where you would like to add the field and choose the type of field to add.
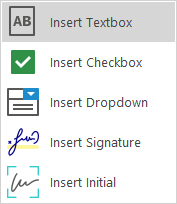
This will place a newly created field on the form at the mouse cursor location from where it can now be customised.
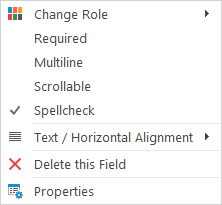
Any field can be customised by simply right-clicking on the field and toggling the options. The context menu will stay visible while clicking the options so you won’t need to right-click the field again after changing a setting. The exact options available will depend on the type of field that is selected. Here are the various settings that can be changed for each field:
- Change Role: Change the role for the selected field to someone else.
- Required: Specify if the field is required or optional. All required fields must be completed before document can be completed.
- Multiline: Only applicable to textboxes. Specify if multiple lines of text are supported.
- Scrollable: Only applicable to textboxes. Specify if the textbox can have scrollbars.
- Spellcheck: Only applicable to textboxes. Specify if spelling errors should be highlighted.
- Text / Horizontal Alignment: Applicable to all fields except checkboxes.
- Line / Vertical Alignment: Applicable only to Signature and Initial fields.
- Checkbox Style: Specify which icon should be used for displaying the checked state in a checkbox. Default is “checkmark”.
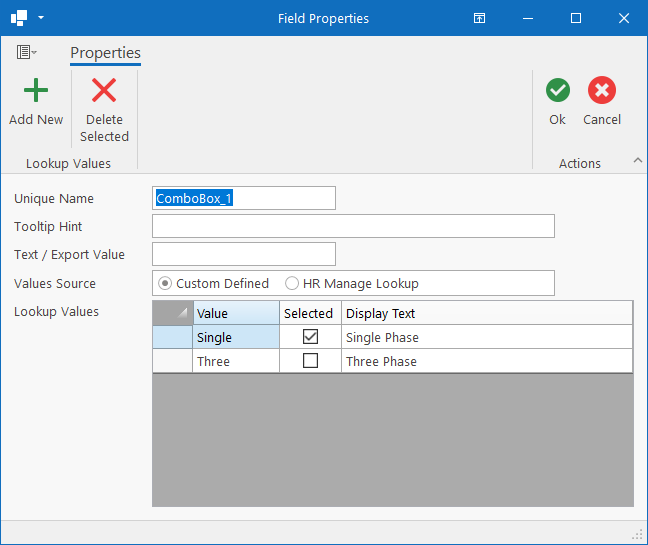
- Properties: This will open the Field Properties window where advanced properties can be set. It contains the following properties that can be set:
- Unique Name: Each field in the document must have a unique name. This is generally automatically set upon creation, but you can change it here.
- Tooltip Hint: Text to display in a tooltip when hovering the mouse cursor over the field.
- Text / Export Value
- Maximum Length: Only applicable to textboxes. Maximum number of characters that can be entered.
- Lookup Values: Only applicable to dropdown lists. Consist of a list of values that the signer can choose from. Each row has a “Value” and “Display Text”.
Saving Changes
Once your form design is complete, be sure to click the Save & Close button on the ribbon bar. You can also save while working by occasionally clicking the Save Form Design button.
This will save the AcroForm template as a linked template to the document in the library and will not make any changes to the source document itself.