
Using the Filter Engine
Introduction
Our originally developed filter engine that has been present in HR Manage since version 2 (2002), provides a powerful and unique way of quickly and easily retrieving data from the server. It helps users pinpoint exactly which records they want to retrieve, reducing wait times associated with retrieving the entire set of records from the server and is much more convenient than the traditional browse one-at-a-time style of other HR and Payroll systems.
Elements
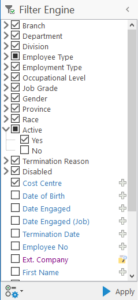
The Filter engine consists of the following elements which will be discussed afterwards:
- Standard Lookup Fields (black)
- Custom Input Fields (blue)
- Advanced Lookup Fields (purple)
- Filter Related Actions (dropdown button)
- Apply: This will take all the parameters from the filter engine and submit it to the server to retrieve the filtered records.
Standard Lookup Fields
These are standard lookup fields in black where the user can simply expand the field and select / deselect the applicable values.
Security is already applied to the lookup fields and only values that the user has access to is selectable.
Custom Input Fields
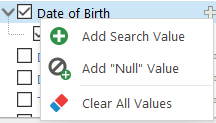
These are non-lookup fields that can be filtered on (blue). Clicking the Add button (plus icon) next to the field will display a popup with input controls to prompt the user for a value to filter on. The exact popup that will display depends on the type of field being filtered on. It is also possible to add multiple filter values per field.
Text Fields
Clicking on the Add button will display the single text value filter popup where the user can enter the search value or part of it and specify which value was entered (the start of the field, end of the field, part of the field, etc.)
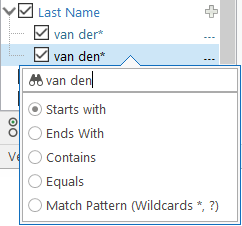
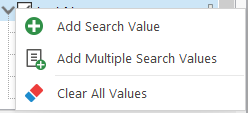
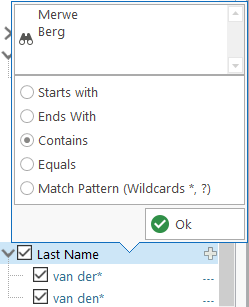
It is also possible to copy multiple values from Excel or some other document and pasting it by right-clicking the field and clicking the Add Multiple Search Values menu item. In the multiline textbox provided, simply paste the values or enter one value per line.
Date Fields
Clicking on the Add button will display the Date Range popup as per below. You can specify dates by either typing them into the boxes provided or clicking on the calendar.
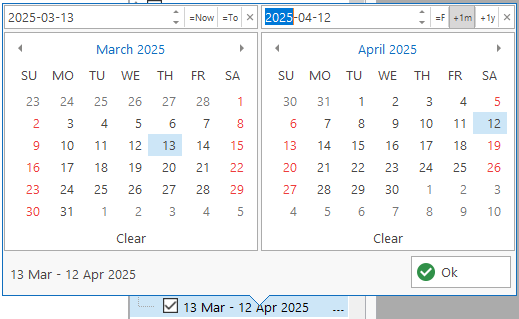
There are also a couple of shortcut button. In the Start date, you can jump to the current date by clicking the =Now button or you can set the date to the same as the end date by clicking the =To button. In the End date, you can set the end date to the same as the start date by clicking the =F button or set it to 1 month after the Start date by clicking the +1m button or to 1 year after by clicking the +1y button. Both dates can also be cleared by clicking the x or Clear buttons.
Depending on which dates are specified, the behaviour will differ somewhat. Here are some of the scenarios:
- If both the start and end dates are the same, the filter will be for only that date. i.e. Value = [Start Date].
- If both start and end dates are specified, then the filter will be for all values that fall within that date range. i.e. [Start Date] <= Value <= [End Date].
- If no Start date is specified, then all the values that fall before the end date will be returned. i.e. Value <= [End Date].
- If no End date is specified, then all the values that fall after the start date will be returned. i.e. Value >= [Start Date].
- If no Start or End date is specified, then all records will be returned where no value is captured. i.e. Value = [null].
Numeric Fields
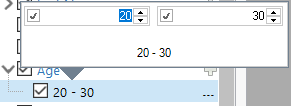
Clicking on the Add button will display the Number Range popup as per below. The concept work exactly the same as the date field above, but just with numbers.
Advanced Lookup Fields
These are fields (in purple) that aren’t simple lookup fields that can be listed, usually due to the number of records in the table or other complexities. Clicking the browse button next to such a field will open a Multi-Record Browser where the records can be filtered and added for inclusion. Upon accepting the selection in that browser, the values will be added to the field in the filter engine.
Filter Related Actions
This is the dropdown button in the bottom-left corner of the filter engine. Clicking it will display a popup menu with actions and settings to control the filter engine. Most of these functions are purely for convenience.
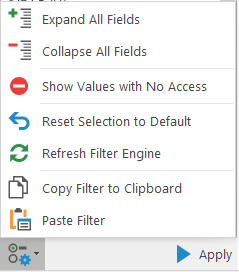
- Expand All Fields: Expand all the fields so that all values are visible.
- Collapse All Fields: Collapse all the fields so that only fields and no values are visible.
- Show Values with No Access: By default, values that a user doesn’t have access to (like certain locations and job grades), are hidden so that only the minimum is visible. Turning this setting on will display all possible values, but the denied values won’t be selectable. In some instances, if a record is missing for a user, it is usually due to security and turning this setting on can help narrow down the cause.
- Reset Selection to Default: When the filter engine opens, there are certain values that are deselected by default while the majority of values are usually selected. An example would be the “Employee Type” (Employee Manager) and “Active” fields. Clicking this action will reset the filter so that only the original selection is selected, regardless of what was changed afterwards.
- Copy Filter to Clipboard & Paste Filter: This will copy all the selected filter values to the clipboard which can then be pasted in a different filter engine. Thus, you can technically have a filter set up in the Training Record Manager, copy it and paste it in the Employee Manager. While the filter fields aren’t all the same, the fields that do match will then match the selection from the copied filter.