
-
HR Manage Application
-
-
- Articles coming soon
-
- Articles coming soon
-
- Articles coming soon
-
-
HR Manage Online
-
Config & Admin
-
IT Documentation
-
Version History
Deleting Records
Introduction
While certain screens might differ in how deleting records are handled, most of them follow the same process and confirmation.
Start by selecting one or more records and clicking the Delete button on the ribbon bar. Alternatives are to right-click the records and then clicking the Delete item from the context menu or to use the Ctrl+Del hotkeys. This will usually display the generic Delete Confirmation dialog.
Delete Confirmation dialog
The confirmation will prompt the user to confirm the records to be deleted and how they must be deleted.
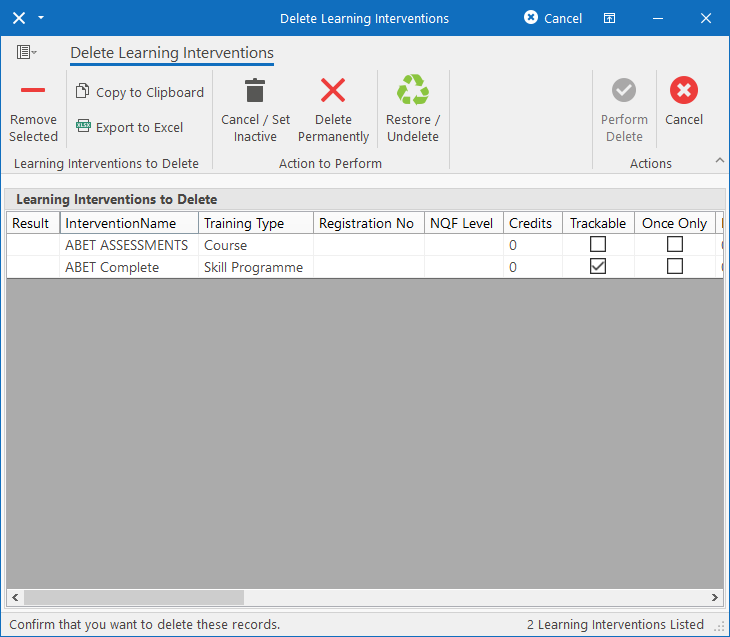
The main list contains the records that will be deleted upon confirmation. If any record was selected by accident, it can still be removed here by selecting it and clicking the Remove Selected button on the ribbon bar.
The user must then select an “Action to Perform” from the ribbon bar. The available options are:
- Cancel / Set Inactive: This will change the status of the records to “Inactive” or “Inactive – Deleted” (depending on the type of record). The records will still be stored on the system, but hidden from view and can usually be undeleted if needed.
- Delete Permanently: This will permanently delete the records from the database. Note that if the records being deleted are used by other records, it will probably cause errors and the “Cancel / Set Inactive” option might need to be used as an alternative.
- Restore / Undelete: Only applicable if inactive records are selected. This will change the status of the records back to “active”.
Once an action has been selected, the Perform Delete button on the ribbon bar will become enabled. Clicking it will perform the selected action and if there are any errors, it will be displayed in the first column in the list. If no errors occurred, the dialog will just close.